dependencies:
smartdata: [version]dev_dependencies:
smartdata_generator: [version]# add build runner if not already addedbuild_runner:
Run the generator
dart run build_runner buildflutter packages pub run build_runner build// or watchflutter packages pub run build_runner watch
Usage
There are 2 ways, on how to setup Smartdata.
You can automatically generate Datagenerators with the included @SmartdataInit Annotation or manually create them.
The Generator supports positional arguments, named arguments and property access via implicit and explicit setters.
The generated Class can then be used in your tests.
@SmartdataInit(forClasses: [Dog])
voidinit() {
$init();
}
voidmain() {
setUp(init); // make sure to call the init, to initialize the generator maptest('should create lots of random dogs', () {
final testData =Smartdata.I.get<Dog>(50);
expect(testData.length, 50);
});
}
Manually create your generator
For flexibility or other reasons you can create your own generator.
Just implement the included Generator class, and add an instance to the Smartdata singleton.
classCustomDogGeneratorextendsGenerator<Dog> {
DoggenerateRandom() {
returnDog('German Shepherd', 1, 'Donald'); // completely random
}
}
voidinit() {
// $init() in case you also want to initialize your automatically generated generatorsSmartdata.put(Dog, CustomDogGenerator());
}
And make sure to call init before running the test.
voidmain() {
setUp(init); // make sure to call the init, to initialize the generator maptest('should create lots of custom random dogs', () {
final testData =Smartdata.I.get<Dog>(50);
expect(testData.length, 50);
});
}
Implementation
How does it work? Behind the scenes is just a Generator class, which can be implemented by everyone.
abstractclassGenerator<T> {
TgenerateRandom();
}
This package provides default implementations for common primitive types, such as Strings, ints, nums and booleans.
classStringGeneratorextendsGenerator<String> {
final _random =Random();
final _strings = ['bulbasaur', 'ivysaur', 'venosaur'];
@overrideStringgenerateRandom() {
return _strings[_random.nextInt(_strings.length)];
}
}
These generators are maintained by a static Map, and can be accessed via the Smartdata Singleton.
// generates a list of 10 random stringsSmartdata.I.get<String>(10);
Examples
Please refer to the example package, for a list of examples and how to use the Smartdata.
You can always run the examples by navigating to the examples package and executing the generator.
$ dart pub get...
$ dart run build_runner build
Roadmap
Feel free to open a Pull Request, if you’d like to contribute.
Or just open an issue, and i do my level best to deliver.
The Form Builder Microservice (FBMS) project is an Apereo uPortal Ecosystem component that adds
Form Builder capabilities to uPortal. This Git repo contains the sources for the back-end
elements of this solution; to use FBMS in uPortal, you must also include its front-end component: form-builder. The form-builder web component is developed independently at the following
location: uPortal-contrib/form-builder. Front-end, back-end, and uPortal communicate
exclusively through REST APIs.
FBMS is developed with the following Java Platform technologies:
Spring Boot
Spring Security
spring-data-jpa
Hibernate
Jackson (JSON)
Running This Project
Using FBMS in uPortal
FBMS does not need uPortal to run, but can be integrated with uPortal version 5.1 or higher.
If you are not setting up a released version of FBMS, run the following to create a snapshot WAR file for FBMS:
./gradlew clean build install
Note the version for this snapshot that can be found in gradle.properties.
The remaining steps are ALL completed in your uPortal-start repo.
Step One: Bundling FBMS
In uPortal-start, add an overlays/fbms/build.gradle file with the following contents:
Replace <form.fname> with the fname of your form (in FBMS). The form’s fname can be found in its definition file.
These were the files added to data/quickstart/fbms/.
Final Step: Provide uPortal’s Signature Key to FBMS
Finally, we need to provide the signature key that uPortal uses to sign the user’s JWT for authentication.
This is usually found in uPortal-start’s etc/portal/uPortal.properties or may have been moved to global.properties
in the same directory. It may be commented out to use the default, but the default entry should be there:
Again, this is the default. Your uPortal-start may have a different value.
Copy this into etc/portal/fbms.properties.
Copy this file into your $PORTAL_HOME directory, usually in uPortal-start at ./gradle/tomcat/portal/
Restart Tomcat
This Completes the uPortal Setup Instructions
Running FBMS with bootRun
It is sometimes helpful to run FBMS without uPortal for development purposes. Use the Spring
Boot Gradle Plugin to launch this project from a local clone of FBMS (this repository).
Pre-Requisite: Database Setup
Before using FBMS stand-alone, the database will need to be configured and a driver added as a dependency.
The drive should be added to fbms-webapp/build.gradle at the end of the dependency section. There already exists
a comment and example for HSQL. You may add any other database driver as needed as a runtime dependency.
fbms-webapp/src/main/resources/fbms.properties should be edited to include database connection configuration.
Other values may also require adjusting based on your needs.
Starting FBMS Stand-Alone
$ ./gradlew fbms-webapp:bootRun
Import/Export Features
Apereo FBMS provides support for importing and exporting data from the console. These features are
tremendously useful for provisioning new environments and migrating data.
Initializing the Database Schema
Use the following command to drop (if necessary) and create the Hibernate-managed database tables:
$ ./gradlew assemble fbms-webapp:bootRunDataInit
Importing
Use the following command to import all Form objects serialized into JSON files that are located in
the docs/examples directory:
NOTE: The location of this directory is very likely to change or (even more likely) become a
parameter in the future. Check this document for changes.
Configuration
:note: FBMS supports the standard uPortal convention for external configuration based on $PORTAL_HOME. Use global.properties for settings that are shared between modules. Use fbms.properties for settings that are exclusive to this module, or to override a setting defined
in global.properties.
CORS Support
Browser-based clients for this microservice will often need to run on a different host or port. In
these cases, support for CORS is required.
Use the org.apereo.portal.fbms.api.cors.origins application property to specify allowed origins
for CORS requests. The default value of this property is http://localhost:8080.
Typically authenticated users have permission to read any form, as well as create, read, and update
their own responses to forms. (In the future FBMS may support updating responses both by
overwriting an existing response and submitting a new response.)
As far as managing forms themselves, there are three types of access:
createAuthority
updateAuthority
deleteAuthority
The createAuthority allows you to create new forms, whereas updateAuthority and deleteAuthority
apply to any form that has been previously created.
The default value for each of these authorities is Portal Administrators, which corresponds to the
group of the same name in uPortal.
Permissions Example
Use the following properties to assign these permissions to one or more different portal groups:
org.apereo.portal.fbms.security.createAuthority=Portal Administrators, Forms Authors
org.apereo.portal.fbms.security.updateAuthority=Portal Administrators, Forms Editors
org.apereo.portal.fbms.security.deleteAuthority=Portal Administrators
API Documentation
FBMS provides API documentation based on Swagger. You can access the Swagger client at http[s]://hostname[:port]/swagger-ui.html.
Hbox is a convenient and efficient scheduling platform combined with the big data and artificial intelligence, support for a variety of machine learning, deep learning frameworks. Hbox is running on the Hadoop Yarn and has integrated deep learning frameworks such as Tensornet, TensorFlow, MXNet, Caffe, Theano, PyTorch, Keras, XGBoost,horovod, openmpi, tensor2tensor. support GPU resource schedule, run in docker and restful api management interface. Hbox has the satisfactory scalability and compatibility.
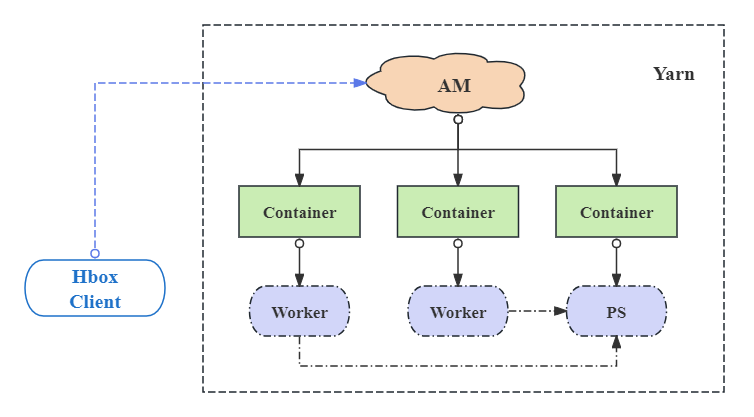
Client: start and get the state of the application.
ApplicationMaster(AM): the role for the internal schedule and lifecycle manager, including the input data distribution and containers management.
Container: the actual executor of the application to start the progress of Worker or PS(Parameter Server), monitor and report the status of the progress to AM, and save the output, especially start the TensorBoard service for TensorFlow application.
Functions
1 Support Multiple Deep Learning Frameworks
Besides the distributed mode of TensorFlow and MXNet frameworks, Hbox supports the standalone mode of all deep learning frameworks such as Caffe, Theano, PyTorch. Moreover, Hbox allows the custom versions and multi-version of frameworks flexibly.
2 Unified Data Management Based On HDFS
Training data and model result save to HDFS(support S3). Hbox is enable to specify the input strategy for the input data --input by setting the --input-strategy parameter or hbox.input.strategy configuration. Hbox support three ways to read the HDFS input data:
Download: AM traverses all files under the specified HDFS path and distributes data to workers in files. Each worker download files from the remote to local.
Placeholder: The difference with Download mode is that AM send the related HDFS file list to workers. The process in worker read the data from HDFS directly.
InputFormat: Integrated the InputFormat function of MapReduce, Hbox allows the user to specify any of the implementation of InputFormat for the input data. AM splits the input data and assigns fragments to the different workers. Each worker passes the assigned fragments through the pipeline to the execution progress.
Similar with the read strategy, Hbox allows to specify the output strategy for the output data --output by setting the --output-strategy parameter or hbox.output.strategy configuration. There are two kinds of result output modes:
Upload: After the program finished, each worker upload the local directory of the output to specified HDFS path directly. The button, “Saved Model”, on the web interface allows user to upload the intermediate result to remote during the execution.
OutputFormat: Integrated the OutputFormat function of MapReduce, Hbox allows the user to specify any of the implementation of OutputFormat for saving the result to HDFS.
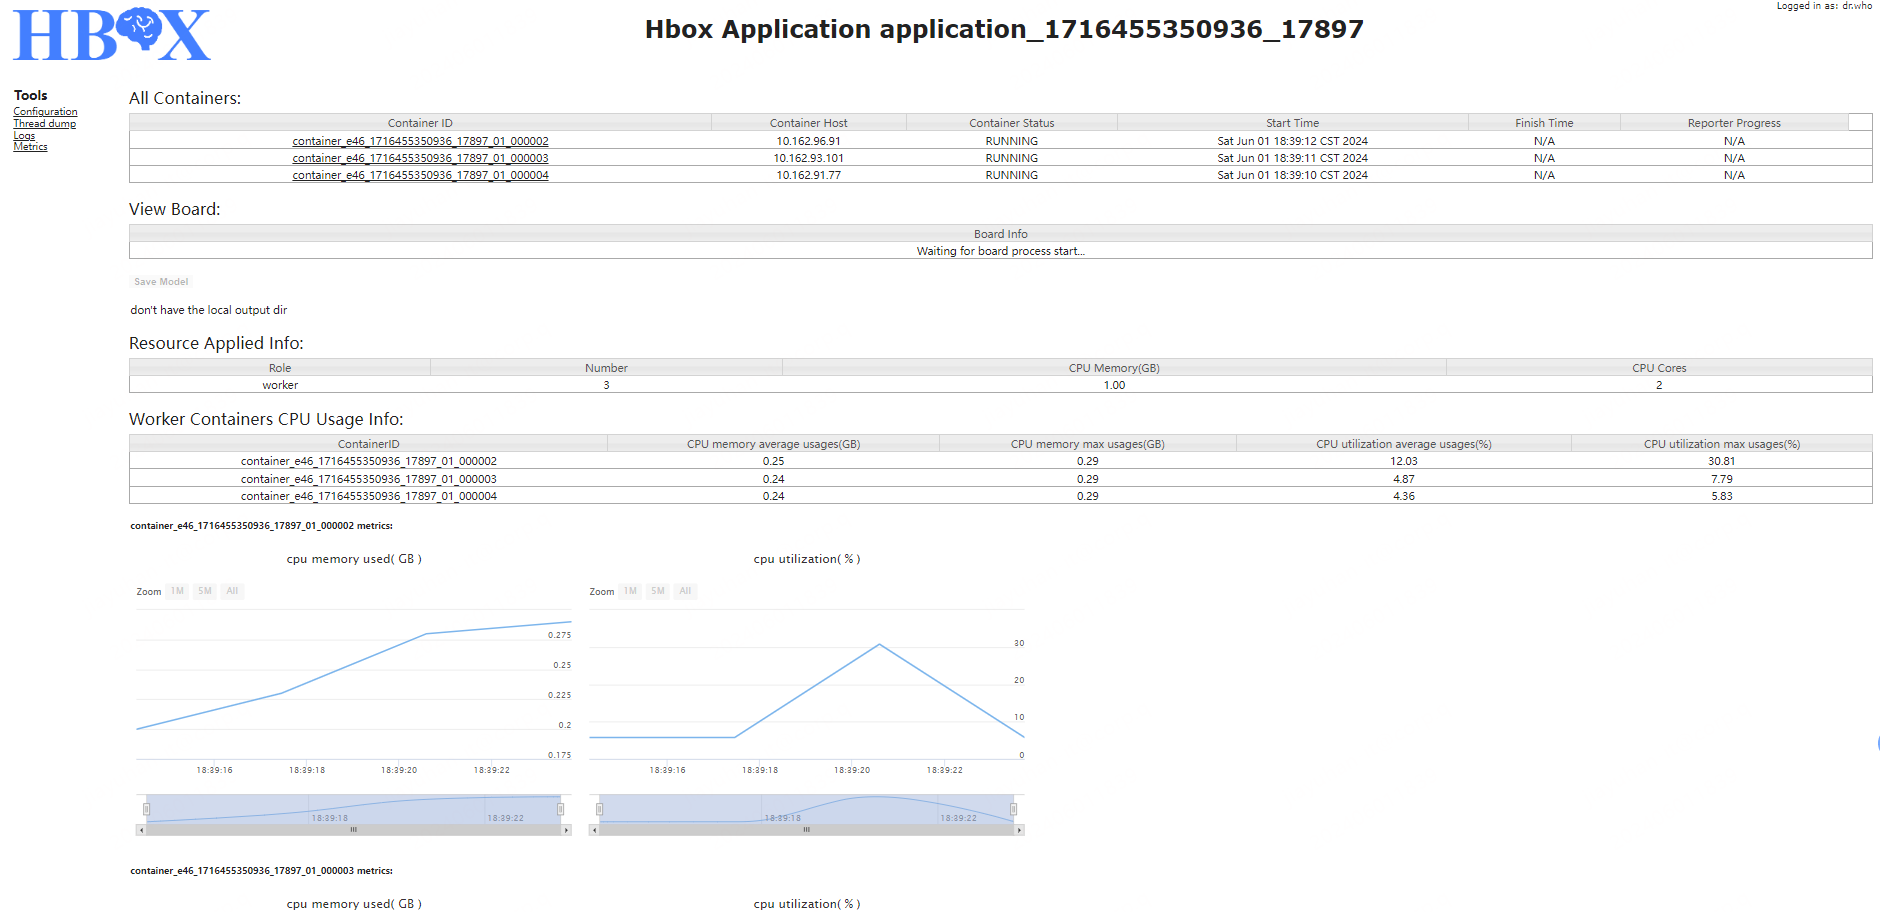
The application interface can be divided into four parts:
All Containers:display the container list and corresponding information, including the container host, container role, current state of container, start time, finish time, current progress.
View TensorBoard:If set to start the service of TensorBoard when the type of application is TensorFlow, provide the link to enter the TensorBoard for real-time view.
Save Model:If the application has the output, user can upload the intermediate output to specified HDFS path during the execution of the application through the button of “Save Model”. After the upload finished, display the list of the intermediate saved path.
Worker Metrix:display the resource usage information metrics of each worker.
As shown below:
4 Compatible With The Code At Native Frameworks
Except the automatic construction of the ClusterSpec at the distributed mode TensorFlow framework, the program at standalone mode TensorFlow and other deep learning frameworks can be executed at Hbox directly.
Compilation & Deployment Instructions
1 Compilation Environment Requirements
jdk >= 1.8
Maven >= 3.6.3
2 Compilation Method
Run the following command in the root directory of the source code:
./mvnw package
After compiling, a distribution package named hbox-1.1-dist.tar.gz will be generated under core/target in the root directory.
Unpacking the distribution package, the following subdirectories will be generated under the root directory:
bin: scripts for managing application jobs
sbin: scripts for history service
lib: dependencies jars
libexec: common scripts and hbox-site.xml configuration examples
hbox-*.jar: HBox jars
To setup configurations, user need to set HBOX_CONF_DIR to a folder containing a valid hbox-site.xml,
or link this folder to $HBOX_HOME/conf.
3 Deployment Environment Requirements
CentOS 7.2
Java >= 1.8
Hadoop = 2.6 — 3.2 (GPU requires 3.1+)
[optional] Dependent environment for deep learning frameworks at the cluster nodes, such as TensorFlow, numpy, Caffe.
4 Hbox Client Deployment Guide
Under the “conf” directory of the unpacking distribution package “$HBOX_HOME”, configure the related files:
hbox-env.sh: set the environment variables, such as:
JAVA_HOME
HADOOP_CONF_DIR
hbox-site.xml: configure related properties. Note that the properties associated with the history service needs to be consistent with what has configured when the history service started.For more details, please see the Configuration part。
log4j.properties:configure the log level
5 Start Method of Hbox History Service [Optional]
run $HBOX_HOME/sbin/start-history-server.sh.
Quick Start
Use $HBOX_HOME/bin/hbox-submit to submit the application to cluster in the Hbox client.
Here are the submit example for the TensorFlow application.
1 upload data to hdfs
upload the “data” directory under the root of unpacking distribution package to HDFS
Hbox is a convenient and efficient scheduling platform combined with the big data and artificial intelligence, support for a variety of machine learning, deep learning frameworks. Hbox is running on the Hadoop Yarn and has integrated deep learning frameworks such as Tensornet, TensorFlow, MXNet, Caffe, Theano, PyTorch, Keras, XGBoost,horovod, openmpi, tensor2tensor. support GPU resource schedule, run in docker and restful api management interface. Hbox has the satisfactory scalability and compatibility.
Client: start and get the state of the application.
ApplicationMaster(AM): the role for the internal schedule and lifecycle manager, including the input data distribution and containers management.
Container: the actual executor of the application to start the progress of Worker or PS(Parameter Server), monitor and report the status of the progress to AM, and save the output, especially start the TensorBoard service for TensorFlow application.
Functions
1 Support Multiple Deep Learning Frameworks
Besides the distributed mode of TensorFlow and MXNet frameworks, Hbox supports the standalone mode of all deep learning frameworks such as Caffe, Theano, PyTorch. Moreover, Hbox allows the custom versions and multi-version of frameworks flexibly.
2 Unified Data Management Based On HDFS
Training data and model result save to HDFS(support S3). Hbox is enable to specify the input strategy for the input data --input by setting the --input-strategy parameter or hbox.input.strategy configuration. Hbox support three ways to read the HDFS input data:
Download: AM traverses all files under the specified HDFS path and distributes data to workers in files. Each worker download files from the remote to local.
Placeholder: The difference with Download mode is that AM send the related HDFS file list to workers. The process in worker read the data from HDFS directly.
InputFormat: Integrated the InputFormat function of MapReduce, Hbox allows the user to specify any of the implementation of InputFormat for the input data. AM splits the input data and assigns fragments to the different workers. Each worker passes the assigned fragments through the pipeline to the execution progress.
Similar with the read strategy, Hbox allows to specify the output strategy for the output data --output by setting the --output-strategy parameter or hbox.output.strategy configuration. There are two kinds of result output modes:
Upload: After the program finished, each worker upload the local directory of the output to specified HDFS path directly. The button, “Saved Model”, on the web interface allows user to upload the intermediate result to remote during the execution.
OutputFormat: Integrated the OutputFormat function of MapReduce, Hbox allows the user to specify any of the implementation of OutputFormat for saving the result to HDFS.
The application interface can be divided into four parts:
All Containers:display the container list and corresponding information, including the container host, container role, current state of container, start time, finish time, current progress.
View TensorBoard:If set to start the service of TensorBoard when the type of application is TensorFlow, provide the link to enter the TensorBoard for real-time view.
Save Model:If the application has the output, user can upload the intermediate output to specified HDFS path during the execution of the application through the button of “Save Model”. After the upload finished, display the list of the intermediate saved path.
Worker Metrix:display the resource usage information metrics of each worker.
As shown below:
4 Compatible With The Code At Native Frameworks
Except the automatic construction of the ClusterSpec at the distributed mode TensorFlow framework, the program at standalone mode TensorFlow and other deep learning frameworks can be executed at Hbox directly.
Compilation & Deployment Instructions
1 Compilation Environment Requirements
jdk >= 1.8
Maven >= 3.6.3
2 Compilation Method
Run the following command in the root directory of the source code:
./mvnw package
After compiling, a distribution package named hbox-1.1-dist.tar.gz will be generated under core/target in the root directory.
Unpacking the distribution package, the following subdirectories will be generated under the root directory:
bin: scripts for managing application jobs
sbin: scripts for history service
lib: dependencies jars
libexec: common scripts and hbox-site.xml configuration examples
hbox-*.jar: HBox jars
To setup configurations, user need to set HBOX_CONF_DIR to a folder containing a valid hbox-site.xml,
or link this folder to $HBOX_HOME/conf.
3 Deployment Environment Requirements
CentOS 7.2
Java >= 1.8
Hadoop = 2.6 — 3.2 (GPU requires 3.1+)
[optional] Dependent environment for deep learning frameworks at the cluster nodes, such as TensorFlow, numpy, Caffe.
4 Hbox Client Deployment Guide
Under the “conf” directory of the unpacking distribution package “$HBOX_HOME”, configure the related files:
hbox-env.sh: set the environment variables, such as:
JAVA_HOME
HADOOP_CONF_DIR
hbox-site.xml: configure related properties. Note that the properties associated with the history service needs to be consistent with what has configured when the history service started.For more details, please see the Configuration part。
log4j.properties:configure the log level
5 Start Method of Hbox History Service [Optional]
run $HBOX_HOME/sbin/start-history-server.sh.
Quick Start
Use $HBOX_HOME/bin/hbox-submit to submit the application to cluster in the Hbox client.
Here are the submit example for the TensorFlow application.
1 upload data to hdfs
upload the “data” directory under the root of unpacking distribution package to HDFS
Although Haruka can be installed via npm i discord-haruka, it’s not recommended, as Haruka isn’t a module. Instead, go to the GitHub repo and get a copy of Haruka’s latest release. In the root directory, open the file called .env.ex, and place your keys in there.
Place your super sensitive keys in here. Be mindful as to not add spaces around the equal sign. DISCORD_TOKEN is your bot’s login token which can be found in the Discord Developer portal. The second key, KANJI_ALIVE_KEY, is your X-Mashape-Key used for KanjiAlive, the API used to retrieve Kanji data. If you don’t wish to use the Kanji function, rename src/functions/kanji.coffee to src/functions/_kanji.coffee and rerun the build command. In a similar fashion, the WA_APPID key is Haruka’s WolframAlpha AppID, which can be found here. You can disable this function similarly to disabling the Kanji function.
The HARUKA_OPS key is a comma-separated list of IDs of users who can run the -h halt command. Add your User ID to the list. If adding multiple people, please separate them with commas WITHOUT any surrounding spaces. The HARUKA_LOG_GUILD_ID and HARUKA_LOG_CHANNEL_ID are for collecting function usage statistics. Haruka will send basic information about the command called in this guild and channel. If you do not wish to gather usage statistics, you may omit these fields.
Finally, rename .env.ex to simply .env. Run npm install to install Haruka’s dependencies, and run her locally by using npm start.
Contributing
First of all, get to know how Haruka works. Haruka is made of several component parts, and understanding how they work will ease development. Install Haruka as mentioned above, create a fork with your changes, and issue a Pull Request. Haruka’s written in CoffeeScript, you can build her by running npm build or npm watch in the root directory with CoffeeScript installed (devDependency). It’s also recommended you have a CoffeeScript linter installed.
If you use this GitHub repository (or any modules associated with it), we would appreciate to cite our NeurIPS publication as follows:
@inproceedings{muttenthaler2022vice,
 author = {Muttenthaler, Lukas and Zheng, Charles Y and McClure, Patrick and Vandermeulen, Robert A and Hebart, Martin N and Pereira, Francisco},
 booktitle = {Advances in Neural Information Processing Systems},
 editor = {S. Koyejo and S. Mohamed and A. Agarwal and D. Belgrave and K. Cho and A. Oh},
 pages = {33661--33675},
 publisher = {Curran Associates, Inc.},
 title = {VICE: Variational Interpretable Concept Embeddings},
 url = {https://proceedings.neurips.cc/paper_files/paper/2022/file/da1a97b53eec1c763c6d06835538fe3e-Paper-Conference.pdf},
 volume = {35},
 year = {2022}
💻 Setting up your environment
Before using VICE, we recommend to create a virtual environment (e.g., vice), including all dependencies, via conda
We provide a DEMO Jupyter Notebook (JN) to guide users through each step of the VICE optimization. The DEMO file is meant to facilitate the process of using VICE. In the DEMO.ipynb one can easily examine whether VICE overfits the trainig data and behaves well with respect to the evolution of latent dimensions over time. Embeddings can be extracted and analyzed directly in the JN.
VICE optimization
Explanation of arguments in main_optimization.py
main_optimization.py--task (str) \ # "odd-one-out" (3AFC; no anchor) or "target-matching" (2AFC; anchor) task--triplets_dir (str) \ # path/to/triplet/data--results_dir (str) \ # optional specification of results directory (if not provided will resort to ./results/modality/init_dim/optim/mixture/seed/spike/slab/pi)--plots_dir (str) \ # optional specification of directory for plots (if not provided will resort to ./plots/modality/init_dim/optim/mixture/seed/spike/slab/pi)--epochs (int) \ # maximum number of epochs to run VICE optimization--burnin (int) \ # minimum number of epochs to run VICE optimization (burnin period)--eta (float) \ # learning rate--init_dim (int) \ # initial dimensionality of the model's embedding space--batch_size (int) \ # mini-batch size--optim (str) \ # optimizer (e.g., 'adam', 'adamw', 'sgd')--mixture (str) \ # whether to use a mixture of Gaussians or Laplace distributions in the spike-and-slab prior (i.e., 'gaussian' or 'laplace')--mc_samples (int) \ # number of weight matrices used in Monte Carlo sampling (for computationaly efficiency, M is set to 1 during training but can be set to any number at inference time)--spike (float) \ # sigma of the spike distribution--slab (float) \ # sigma of the slab distribution--pi (float) \ # probability value that determines the relative weighting of the distributions; the closer this value is to 1, the higher the probability that weights are drawn from the spike distribution--k (int) \ # an embedding dimension is considered important (and won't be pruned) if the minimum number of objects with a non-zero weight is larger than k (we recommend to set this value to 5 or 10)--ws (int) \ # determines for how many epochs the number of latent dimensions (after pruning) is not allowed to vary (ws >> 100)--steps (int) \ # perform validation, save model parameters and create model and optimizer checkpoints every <steps> epochs--device (str) \ # cuda or cpu--num_threads (int) \ # number of threads used for intraop parallelism on CPU; use only if device is CPU (won't affect performance on GPU)--rnd_seed (int) \ # random seed for reproducibility--verbose (bool) \ # show print statements about model performance and evolution of latent dimensions during training (can be easily piped into log file)
Note that triplet data is expected to be in the format N x 3, where N = number of triplets (e.g., 100k) and 3 refers to the three objects in a triplet, where col_0 = anchor, col_1 = positive, col_2 = odd-one-out/negative. Triplet data must be split into train and test splits, and named train_90.txt or train_90.npy and test_10.txt or test_10.npy respectively.
Every --steps epochs (i.e., if (epoch + 1) % steps == 0) a model_epoch.tar (including model and optimizer state_dicts) and a results_epoch.json (including train and validation cross-entropy errors) file are saved to disk. In addition, after convergence of VICE, a pruned_params.npz (compressed binary file) with keys pruned_loc and pruned_scale, including pruned VICE parameters, is saved to disk. Latent dimensions of the pruned parameter matrices are sorted according to their overall importance. See output folder structure below for where to find these files.
train.py (which is invoked by main_optimization.py) plots train and validation performances (to examine overfitting) against as well as negative log-likelihoods and KL-divergences (to evaluate contribution of the different loss terms) alongside each other. Evolution of (identified) latent dimensions over time is additionally plotted after convergence. See folder structure below for where to find plots after the optimization has finished.
Explanation of arguments in main_robustness_eval.py
main_robustness_eval.py--task (str) \ # "odd-one-out" (3AFC; no anchor) or "target-matching" (2AFC; anchor) task--results_dir (str) \ # path/to/models--n_objects (int) \ # number of unique objects/items/stimuli in the dataset--init_dim (int) \ # latent space dimensionality with which VICE was initialized at run time--batch_size (int) \ # mini-batch size used during VICE training--thresh (float) \ # Pearson correlation value to threshold reproducibility of dimensions (e.g., 0.8)--optim (str) \ # optimizer that was used during training (e.g., 'adam', 'adamw', 'sgd')--mixture (str) \ # whether a Gaussian or Laplacian mixture was used in the spike-and-slab prior (i.e., 'gaussian' or 'laplace')--spike (float) \ # sigma of spike distribution--slab (float) \ # sigma of slab distribution--pi (float) \ # probability value that determines likelihood of samples from the spike--triplets_dir (str) \ # path/to/triplet/data--mc_samples (int) \ # number of weight matrices used in Monte Carlo sampling for evaluating models on validation set--device (str) \ # cpu or cuda--rnd_seed (int) \ # random seed
Find the best hyperparameter combination via find_best_hypers.py
find_best_hypers.py--in_path (str) \ # path/to/models/and/evaluation/results (should all have the same root directory)--percentages (List[int]) \ # List of full dataset fractions used for VICE optimization
After calling find_best_hypers.py, a txt file called model_paths.txt is saved to the data split subfolder in path/to/models/and/evaluation/results pointing towards the latest model snapshot (i.e., last epoch) for the best hyperparameter combination per data split and random seed.
VICE embeddings
VICE embeddings for THINGS can be found here. The corresponding object concept names can be found on OSF or here.
If you want to download the embeddings and the tsv file containing the object names simultaneously, download this file and execute it as follows
$ bash get_embedding.sh
This will download the THINGS object concept names to a subdirectory called $(pwd)/data/things and the VICE embeddings for the THINGS objects to a different subdirectory called $(pwd)/embeddings/things/.
Tripletize any data
Tripletizing representations
VICE can be used for any data. We provide a file called main_tripletize.py that converts (latent) representations from any domain (e.g., audio, fMRI or EEG recordings, Deep Neural Network features) corresponding to some set of stimuli (e.g., images, words) into an N x 3 matrix of N triplets (see triplet format above). We do this by exploiting the similarity structure of the representations.
main_tripletize.py--in_path (str) \ # path/to/latent/representations--out_path (int) \ # path/to/triplets--n_samples (int) \ # number of triplet combinations to be sampled--rnd_seed (int) \ # random seed to ensure reproducibility of triplet sampling
This repo is part of the Bargaining Bot.
This is the machine learning model that predicts the price that the bot uses to bargain with users.
This is a Linear Regression Model made using the Keras API
(Note that this model was not made using the latest version of tensorflow i.e Tensorflow 2.0)
LTEX+ Extension for VS Code: Grammar/Spell Checker Using LanguageTool with Support for LATEX, Markdown, and Others
LTEX+ provides offline grammar checking of various markup languages in Visual Studio Code using LanguageTool (LT). LTEX+ currently supports:
LATEX, BibTEX, ConTEXt and rsweave
Markdown, MDX and Quarto
Typst
AsciiDoc
Org and Neorg
reStructuredText
XHTML
In addition, LTEX+ can check comments in many popular programming languages (optional, opt-in).
The difference to regular spell checkers is that LTEX+ not only detects spelling errors, but also many grammar and stylistic errors such as:
This is an mistake.
The bananas is tasty.
We look forward to welcome you.
Are human beings any different than animals?
A classic use case of LTEX+ is checking scientific LATEX papers, but why not check your next blog post, book chapter, or long e-mail before you send it to someone else?
Until version 13.1.0, Julian Valentin developed LTEX+ as LTEX.
LTEX is a fork of the abandoned LanguageTool for Visual Studio Code extension. This extension would not have been possible without the work of Adam Voss† and Julian Valentin.
Features
Comes with everything included, no need to install Java or LanguageTool
Offline checking: Does not upload anything to the internet
Supports over 20 languages: English, French, German, Dutch, Chinese, Russian, etc.
Issue highlighting with hover description
Replacement suggestions via quick fixes
User dictionaries
Multilingual support with babel commands or magic comments
If you want to check documents written in a markup language that VS Code does not support out-of-the-box (e.g., LATEX), install an extension that provides support for that language (e.g., LaTeX Workshop Extension for VS Code) in addition to this extension.
Open a LATEX or a Markdown document, or open a new file and change the language mode to LaTeX or Markdown (open the Command Palette and select Change Language Mode)
Wait until ltex-ls has been found; if necessary, LTEX+ downloads it for you. Alternatively, you can choose offline installation.
Grammar/spelling errors will be displayed! (if there are any)