A list of security configurations for Linux installations.
•••
Introduction
This is a personal repository of shell scripts and configuration files for various Linux installations, which harden and up various aspects of the security for those systems. This repository will include scripts for system hardening & for other tools which warrant it.
This is not an exhaustive listing of all the security configurations used at any given time, as more tunings are made depending on the installation.
How to Run it
Simply give execution permissions & run the shell script with the select configuration, located at the root directory of the repository:
cd linux-security

chmod +x $(pwd)/security.sh
$(pwd)/security.sh
How to Use it
Run the shell script that sets the desired configuration and reboot the computer after a successful run. Always vet the commands run by shell scripts downloaded from the internet and non-official repositories before running them.
The scripts are meant to be set-and-forget, and as such minimal interaction is necessary.
About Security
Sources
Security information was gathered from a range of sources, mainly:
Kicksecure Security and GrapheneOS Infrastructure Repositories; Wiki and User Forums:
Privacy Guides’ and PrivSec Hardening Guides (Madaidan’s Insecurities referenced, but it is outdated):
Arch Linux Wiki Security Section
Guiding Principles
Rapidly updating OS with Secure Boot support and large backing, but hardened against breakage, which means either:
BTRFS root, with snapper and grub2-btrfs packages installed
Immutable Operating Systems, with rapid updating model
Heavy referencing of ChromeOS’ design decisions was made in order to choose hardening flags.
Security Additions
Kernel Lockdown in Confidentiality Mode (lockdown=confidentiality)
The VSConan extension helps you manage the conan local cache on your machine. It gives you easy access to your local cache and allows you to manage it by using integrated explorer in the Visual Studio Code without typing a single line of command in the terminal. VSConan provides variety of features, including a quick overview of installed packages, renaming and duplicating profiles, enabling and disabling remotes and more. For more information see Extension Features.
VSConan contributes to official VS Code configurations (settings.json), where you can configure the environment to use this extension.
As a starting point you can configure following settings, that are the core settings and provide you a high flexibility to use this extension:
vsconan.conan.profile.configurations
In this section of settings you can store multiple configuration profiles, that contain necessary information to use conan from your system. Let’s take a look at the following example:
In the example above, we defined the foo and bar profile to start using this extension. Each profile has different configuration for the python interpreter and the conan executable. One thing that we notice here is that we can select the conan version, we want to use, 1 or 2. This information is crucial for the extension in order to get the correct API.
NOTE: Make sure you combine the conanVersion and its binary accordingly. Otherwise it will have strange behaviours or things might even not work properly.
Using conanUserHome we can overwrite the current conan user home directory. This attribute is optional and has default value of null. In the example of foo, conanUserHome is not defined, which means that the conan user home directory uses the default path or predefined environment variable (See Environment Variables).
vsconan.conan.profile.default
After defining foo and bar profiles, now it is time for us to choose which configuration we want to use currently.
"vsconan.conan.profile.default": "foo"
Extension Features
The VSConan extension contains two major groups of features, one of them is the Conan Explorer, where you can use to manage your local cache, and the other one is Conan Workspace, where you can save your configuration of different conan flow commands in your VSCode workspace.
Conan Explorer
The VSConan extension contributes a Conan Explorer view to VS Code. The Conan Explorer lets you examine and manage important assets of your conan local cache, such as recipe, binary packages, profile and remote.
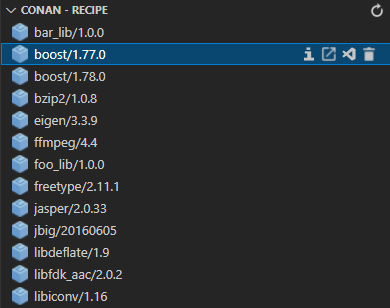
Conan Recipe
In the Conan Recipe explorer you can have an overview of the installed conan recipe in your local cache.
As you can see in the picture above, there are several inline options on each item in the treeview.
Information
Open a web view in VS Code editor, that contains information about this selected recipe. Currently the web view only shows a plain JSON text, that is obtained from the Conan CLI.
Open in Explorer
Open the the recipe path in the explorer
Open in VS Code
Open the selected recipe in a new VS Code window
Remove
Remove the selected recipe
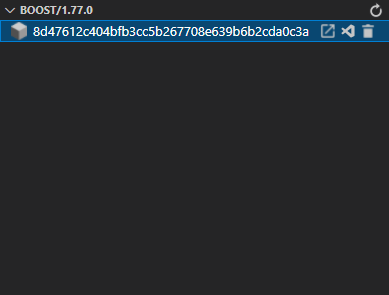
Conan Binary Package
By selecting the recipe, the corresponded binary packages will be shown in this treeview.
Each item of this treeview has following options to offer:
Open in Explorer
Open the selected binary package in the explorer
Open in VS Code
Open the selected binary package in a new VS Code window
Remove
Remove the selected binary package
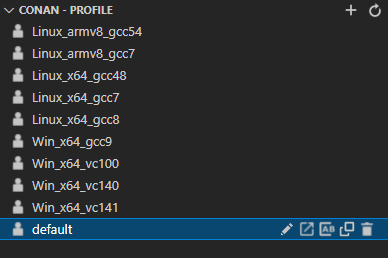
Conan Profile
All the profiles that you saved on your machine will be listed in this explorer. By pressing + button on top right corner of the treeview, you can create a new empty profile.
As the other treeviews, each item of this treeview contains several functionalities:
Edit
Open the selected profile in the VS Code editor
Open in Explorer
Open the selected profile in the file explorer
Rename
Rename the selected profile
Duplicate
If you want to change a small detail from a certain profile but you do not want to lose the original profile, we provide you this duplicate option to fulfill your purpose.
Remove
Remove the selected profile
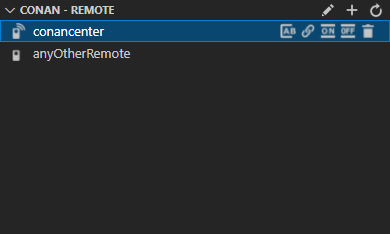
Conan Remote
Finally we come to the last part of this explorer, which is the explorer of the conan remote.
The explorer itself provides you following options:
Edit
Since the collection of remotes in conan is defined in one file called remotes.json, this option is not available of each remote item in the treeview. This will open remotes.json file in the VS Code editor instead.
Add
Add a new remote
As other treeview, each item is equipped with several options, that you can use to maintain your remotes.
Rename Remote
Rename the selected remote
Update URL
Modify the URL in the selected remote
Enable Remote
Enable the selected remote. Enabled remotes can be seen from the icon next to the remote name. The remote conancenter in the picture above is enabled.
Disable Remote
Disable the selected remote. Disabled remotes can be seen from the icon next to the remote name. The remote anyOtherRemote in the picture above is disabled.
Remove Remote
Remove the selected remote
Conan Workspace
The Conan Workspace feature provides you configuration file, that can be used to execute predefined conan flow command and its arguments. The configuration will be stored under .vsconan folder in your workspace.
If you work a lot with conan and use VS Code as your IDE, this feature can be really beneficial for you. It can spare you some seconds by avoiding to type same command, maybe with different arguments in your terminal over and over again. Instead you can save the command that you want to execute in the configuration and reuse in the next execution. In addition to that, the configuration file is reusable, and can be distributed to other people, if you work in a team.
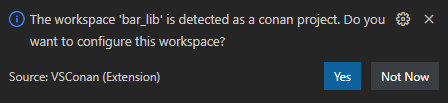
VSConan Extension will detect your workspace as conan workspace, if it contains a conanfile.py or conanfile.txt, and will a show dialog box as following
If you choose yes, VSConan will generate a default configuration file in your workspace to start with.
If you want to configure your workspace manually, we also provide you possibility to create a default configuration file using VS Code command VSConan: Create Workspace Configuration (JSON).
Currently supported conan command for configuration file:
create
install
build
source
package
export-pkg
The execution of the conan command will be done by the interpreter / conan executable from the profile that you selected. This configuration can be used for Conan version 1 and 2.
The default configuration file can be seen as following. You can extend the list of each command to have different name, description, user, channel and many other details.
Application of Conan’s buildEnv/runEnv (currently Conan 2 only)
VSConan provides the commands
VSConan: Activate BuildEnv
VSConan: Activate RunEnv
VSConan: Deactivate BuildEnv/RunEnv
to adjust VSCode’s process and terminal environment to the respective Conan environment.
This is useful if you have tool dependencies in your Conanfile, e.g. CMake, a specific Compiler toolchain, etc and want to use these tools also in VSCode, e.g. the CMake Extension.
The Python extension overrides the PATH environment variable to add the currently selected Python interpreter.
In order to use PATH modifications by Conan BuildEnv/RunEnv the VSConan extension provides the option to generate a .env-file which is respected by the Python extension.
This option is enabled by default and can be managed by vsconan.conan.env.dotenv.
If this extension is useful and can save some of your time during your productive day, I would really appreciate a cup of coffee to keep me awake to continue developing this extension.
Credits
Demonstration video for GIF was recorded using Chronicler.
This is a Rust library to help the next generation of web applications make use
of UCANs in their authorization flows. To learn more about UCANs and how you
might use them in your application, visit https://ucan.xyz or
read the spec.
This library recommends using pre-commit for running pre-commit
hooks. Please run this before every commit and/or push.
Once installed, Run pre-commit install to setup the pre-commit hooks
locally. This will reduce failed CI builds.
If you are doing interim commits locally, and for some reason if you don’t
want pre-commit hooks to fire, you can run
git commit -a -m "Your message here" --no-verify.
Conventional Commits
This library lightly follows the
Conventional Commits convention to help explain
commit history and tie in with our release process. The full specification
can be found here. We recommend prefixing your commits with
a type of fix, feat, docs, ci, refactor, etc…, structured like so:
Import template contains sample data for reference. For first-time users, I would recommend reviewing the Readme tab as it will outline important details such as what is required for import. Details also listed below:
Field
Comments
Field Type
Required; Can only use types available in drop-down
Entity (schema name)
Required
Field Label
Required; please note character limit in tooltip
Field Schema Name
Required; please note character limit in tooltip
Required Level
Required; Can only use types available in drop-down
Solution Unique Name
Required
Description
Non-required; Please note character limit in tooltip
Audit Enabled
Non-required
Max Length (single line of text)
Non-required
Max Length (multiple lines of text)
Non-required
Max Value (Whole Number)
Non-required
Min Value (Whole Number)
Non-required
Option Set Type
Required for Field Type “Option Set”
Option Set Values
Required for Field Type “Option Set”
New Global Option Set Display Name
Required for New Global Option Set type
New Global Option Set Schema Name
Required for New Global Option Set type (lowercase)
Existing Global Option Set Schema Name
Required for Existing Global Option Set type (lowercase)
Precision
Non-required; Default is 2
Referenced Entity
Required for lookups; Must be schema name of entity
One > N Relationship Schema Name
Required for lookups; Must be schema name of entity
Furnish the template with your data and save as a csv.
[2] Upload CSV
Browse and select the location of your import template csv.
[3] Submit and review results
Upon submission you will be provided updates as attributes are processed. All errors and successes will be logged and exportable once the job is complete.
If you would like to resubmit, hit refresh and start again.


 https://github.com/HenryRabelo/linux-security