Blog

  • h3cflowd

    h3cflowd: collect H3C router/firewall NAT userlog(flowlog) Flow 3.0

    说明:

    收集H3C路由器/防火墙输出的NAT流日志(userlog/flowlog)。

    H3C路由器/防火墙可以将NAT流日志输出,本程序用来收集日志(Flow 3.0)并压缩存放为文件。

    参考文档:https://www.h3c.com/cn/d_201904/1173810_30005_0.htm

    数据格式:flow_fields.md

    使用步骤:

    1. H3C路由器/防火墙上增加配置,输出NAT流Flow 3.0日志:

     nat log enable     ; 启用NAT流日志
     nat log flow-active 30 ; 持续的流,每隔30分钟发送流日志,建议启用
     nat log flow-begin ; 记录流开始信息,会产生更多日志,如果节省空间可以不启用
     nat log flow-end   ; 记录流结束信息,建议启用
    
     userlog flow export version 3
     userlog flow export source-ip 172.16.0.1       ; 流日志的源IP,设备的某个IP
     userlog flow export host 172.16.21.2 port 4000 ; 日志收集服务器,172.16.21.2 是运行本程序的机器
    
     session statistics enable                      ; 如果收集的日志中没有数据包/字节统计,可以启用统计
    

    2. 建立目录,用来存放日志

    mkdir /natlog
    

    日志压缩存放在/natlog目录下,每天自动生成一个文件。日志文件大小与网络规模和用户使用习惯有关,500个IP左右的网络,每天日志约1-2GB。

    如果 / 目录下空间少,/home 目录下空间多,可以建立目录 /home/natlog 并生成 /natlog 软链接

    mkdir /home/natlog
    ln -s /home/natlog /natlog
    

    3. 下载、编译程序

    首先安装gcc、git软件,然后

    cd /usr/src
    git clone https://github.com/bg6cq/h3cflowd.git
    cd h3cflowd
    make
    

    4. 测试执行程序

    ./h3cflowd -d
    

    程序在UDP 4000端口接收流日志数据,因此要修改防火墙规则,允许接收UDP 4000端口数据包。

    如果有日志输出说明工作正常。

    5. 执行程序

    请参考 run.sh 设置开机启动执行程序。

    run.sh 可以在系统启动时执行,比如在 /etc/rc.d/rc.local 中增加

    screen -d -m /usr/src/h3cflowd/run.sh  &
    

    chmod u+x /etc/rc.d/rc.local

    程序正常执行时,每收到100个UDP流日志包显示”.”字符,每显示30个”.”字符会显示接收到的UDP包、流日志统计信息。
    如果您的系统流日志速率高,建议用命令参数-n num指定更多包再显示”,”,如-n 1000指定接收1000个UDP包时显示”.”字符。

    注意:如果因程序更新需要停止已在运行的程序,建议使用kill -HUP pid_of_h3cflowd停止,这样可以将正在压缩的日志完整存储。否则直接kill进程最后的日志未完整保存。

    5. 日志文件说明

    日志存放在/natlog目录下,是.gz压缩的文本文件。日志文件累计到一定大小才会写磁盘,因此如果日志量少,请多等一些时间才会有文件。日志文件可以使用zless /natlog/XXXX 或 zgrep YYYYY /natlog/XXXX查看或检索。日志文件典型的内容如下:

    时间 协议 操作字 源IP NAT后源IP 源端口 NAT后源端口 目的IP NAT后目的IP 目的端口 NAT后目的端口 发包数/发字节 收包数/收字节 时间
    11:25:35 tcp 8 172.16.6.4 1.21.26.10 53683 18223 11.10.23.14 11.10.23.14 80 80 1 52 0 0 0
    11:26:08 tcp 2 172.16.6.4 1.21.26.10 53683 18223 11.10.23.14 11.10.23.14 80 80 1 52 1 52 33
    

    时间戳来自于NAT流日志信息,由路由器/防火墙产生,建议路由器/防火墙使用ntp对时,确保时间的准确。

    tcp/udp后的8/2是操作字,表示记录流日志的原因。

    8表示是连接新建的记录。如果路由器/防火墙上不配置nat log flow-begin则无连接新建记录,可以节省存储空间。1 52 0 0是发送数据包/发送字节 接收数据包/接收字节。如果缺少这部分信息,请试着在路由器/防火墙上增加session statistics enable配置。

    2或其它表示是连接结束的记录,1 52 1 52是发送数据包/发送字节 接收数据包/接收字节,33 是该连接的持续时间。

    操作字对应的记录生成流日志的原因如下:

    0:保留不用
    1:正常流结束
    2:定时器超时老化
    3:清除配置/配置变动引起的流老化
    4:资源不足带来的流老化
    5:保留不用
    6:活跃流定期记录其连接情况
    7:新的流创建触发强制删除原有流
    8:流创建
    FE:其他
    10~FE-1:以后扩充用
    

    此外,本程序还支持输出json格式(命令行使用 -j选项)流日志文件,以方便使用fluentd、filebeat之类的软件读取并转发到ELK系统。
    json格式文件是未压缩文本文件,占用空间较大,是默认压缩日志文件的20倍左右,因此使用json格式输出时,要关注及时清理文件。

    7. 日志文件清理

    请参考 crontab.txt,自动清理超过200天的日志文件。

    8. 程序命令行

    ./h3cflowd -h输出如下帮助信息

      collect H3C router/firewall NAT userlog(flowlog)
    
      h3cflowd [ -h ] [ -d ] [ -j ] [ -c ] [ -p port ] [ -n num ] [ -w work_dir ]
            -h            print help message
            -d            enable debug
            -j            store log files in json format,
                          for fluentd or filebeat to read
            -c            use host clock instead of router/firewall
            -p port       udp port, default is 4000
            -n number     number of udp packets to print ., default is 100
            -w work_dir   directory to save log file, default is /natlog
    
     Note: send KILL signal cause h3cflowd to terminate gracefully.
    

    9. 系统优化

    对于Linux系统,建议修改以下参数以设置足够大的UDP缓冲区,减少丢包的可能。

    sysctl -w net.core.rmem_max=4194304
    

    10. 日志容量估算

    每秒钟新建NAT连接的数量大致决定了日志的多少。

    路由器/防火墙上执行display session statistics可以看到每秒钟新建的连接数(Session establishment rate),从而可以估算出日志文件需要的空间。

    下面是一个显示的例子,每秒钟新建连接是570。

    Router>dis session statistics
    Slot 0:
    Current sessions: 28817
              TCP sessions:                13064
              UDP sessions:                15539
             ICMP sessions:                  213
            RAWIP sessions:                    1
    
    Current relation-table entries: 1
    
    Session establishment rate: 570/s
              TCP:                 208/s
              UDP:                 349/s
             ICMP:                  13/s
    

    以每秒钟1000个新建连接估算,如果每个连接产生2条流日志,每天产生172.8M(1.72亿)条流日志。
    原始Flow 3.0流日志UDP数据包为11GB,转换为文本后约为14GB,压缩后大约占用2.5GB空间。如果使用json格式文件,则文件大小约45GB。

    此时路由器/防火墙每秒钟发给流日志采集记录服务器1000*2/15=133个UDP包,约136KB字节,占用带宽1.1Mbps。

    这大约是1Gbps,500人左右上网的日志规模。

    11. 其他

    使用中有任何问题或建议,欢迎联系 james@ustc.edu.cn

    Visit original content creator repository
    https://github.com/bg6cq/h3cflowd

  • gauge-taiko-ts-template

    Taiko

    A node.js library to automate chrome/chromium browser

    Taiko REPL

    What’s Taiko?

    Taiko is a free and open source browser automation tool built by the team behind Gauge from ThoughtWorks. Taiko is a node library with a clear and concise API to automate the chrome browser. Tests written in Taiko are highly readable and maintainable.

    With Taiko it’s easy to

    • Get Started
    • Record/Write/Run tests

    Taiko’s smart selectors make tests reliable by adapting to changes in the structure of your web application. With Taiko there’s no need for id/css/xpath selectors or adding explicit waits (for XHR requests) in test scripts.

    Features

    Taiko is built ground up to test modern web applications. Here’s a list of a few unique features that sets it apart from other browser automation tools.

    • Easy Installation
    • Interactive Recorder
    • Smart Selectors
    • Handle XHR and dynamic content
    • Request/Response stubbing and mocking

    Getting Started

    Easy Installation

    Taiko works on Windows, MacOS and Linux. You only need to have Node.js installed in your system to start writing Taiko scripts in JavaScript. After you’ve installed Node.js open a terminal application (or powershell in the case of Windows) and install Taiko using npm with the command

    $ npm install -g taiko
    

    This installs Taiko and the latest version of Chromium browser. We are all set to do some testing!

    Interactive Recorder

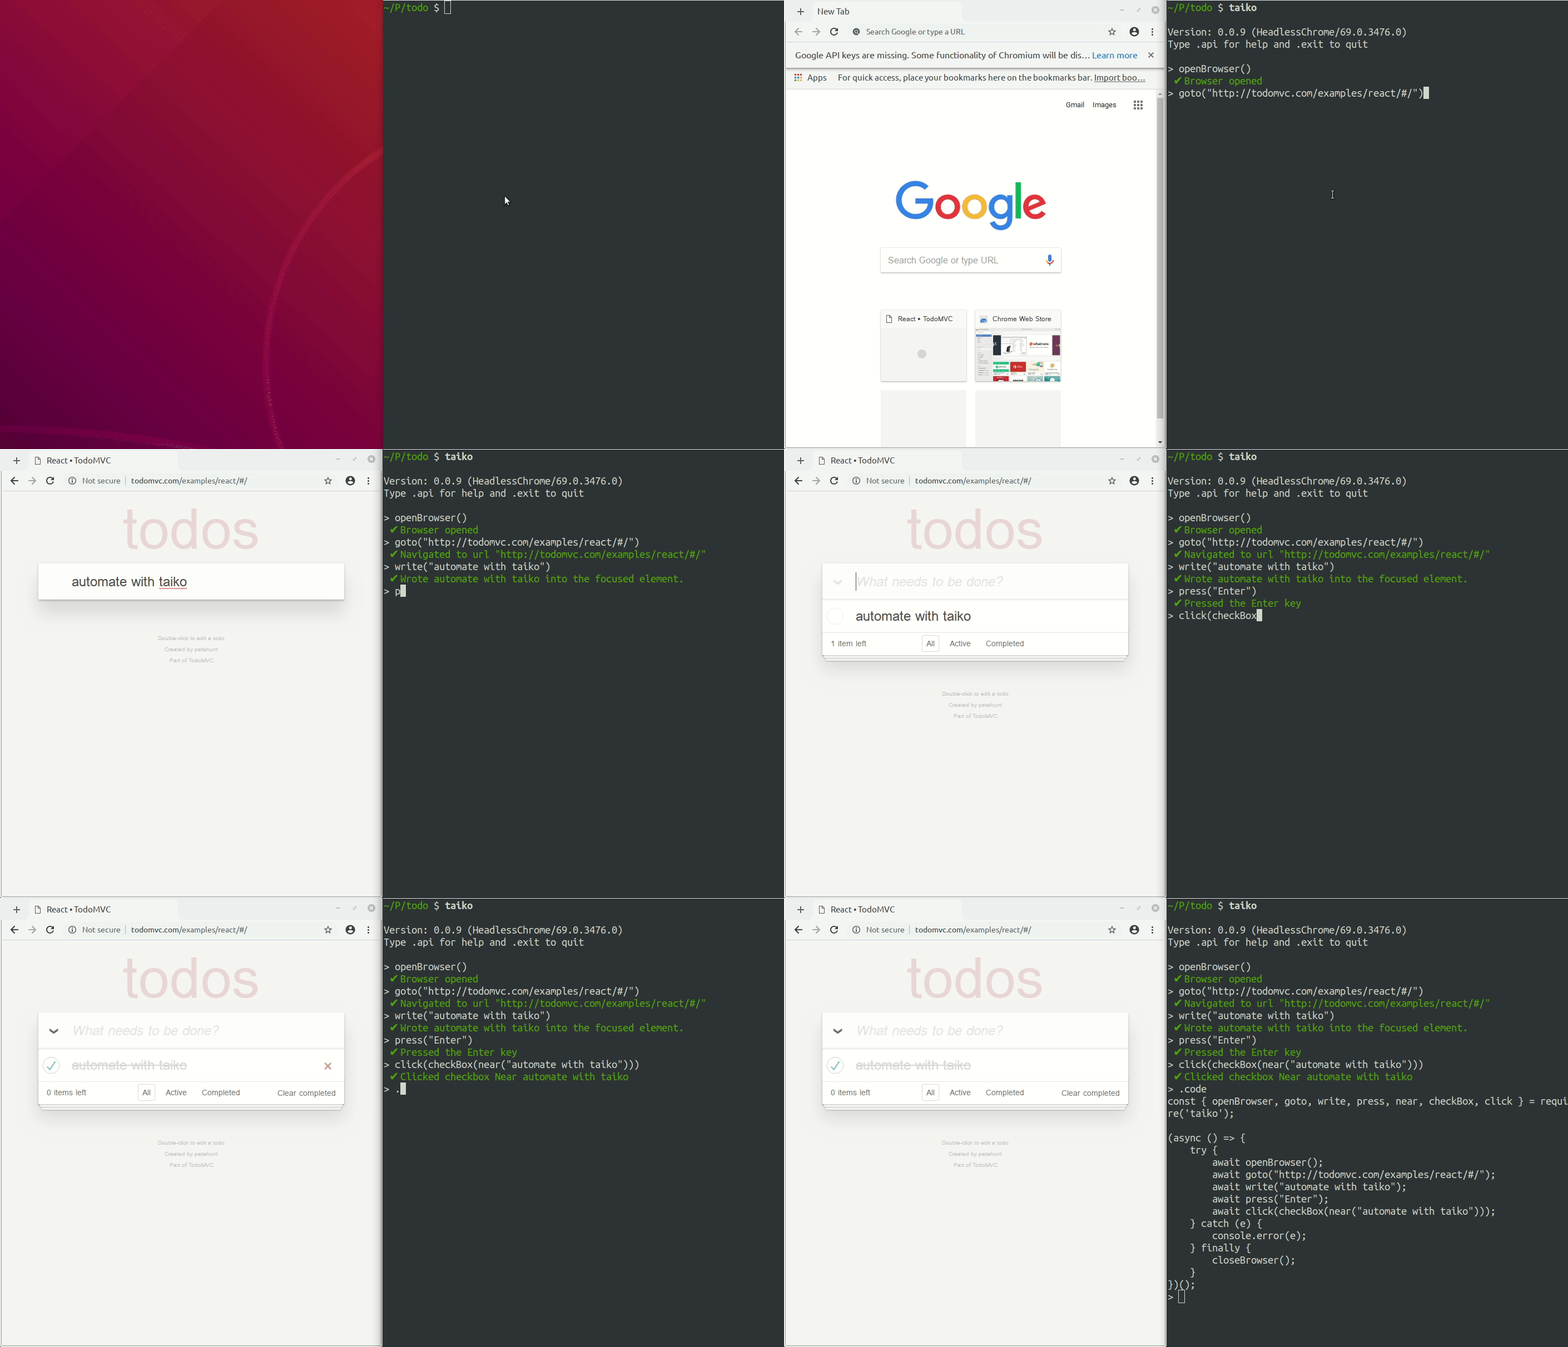
    Taiko comes with a Recorder that’s a REPL for writing test scripts. You can use Taiko’s JavaScript API to control the browser from the REPL. To launch the REPL type taiko in your favorite terminal application

    $ taiko
    Version: 0.2.0 (Chromium:69.0.3476.0)
    Type .api for help and .exit to quit
    > 
    

    This launches the Taiko prompt. You can now use Taiko’s API as commands in this prompt. For example, launch a Chromium browser instance using

    > openBrowser()
    

    You can now automate this Chrome browser instance with commands, for example, make the browser search google for something.

    > goto(“google.com”)
    > write(“taiko test automation”)
    > click(“Google Search”)
    

    These commands make the browser go to google’s home page, type the text “taiko test automation” and click on the “Google Search” button. You can see the browser performing these actions as you type and press enter for each command.

    Taiko’s REPL keeps a history of all successful commands. Once you finish a flow of execution, you can generate a test script using the special command .code

    > .code
    const { openBrowser, goto, write, click } = require('taiko');
    
    (async () => {
        try {
            await openBrowser();
            await goto("google.com");
            await write("taiko test automation");
            await click("Google Search");
        } catch (e) {
                console.error(e);
        } finally {
                closeBrowser();
        }
    })();
    

    Taiko generates readable and maintainable JavaScript code. Copy and modify this code or save it directly to a file using

    > .code googlesearch.js
    

    You can choose to continue automating or finish the recording using

    > .exit
    

    To run a Taiko script pass the file as an argument to taiko

    $ taiko googlesearch.js
    ✔ Browser opened
    ✔ Navigated to url "http://google.com"
    ✔ Wrote taiko test automation into the focused element.
    ✔ Clicked element containing text "Google Search"
    ✔ Browser closed
    

    By default Taiko runs the script in headless mode, that means it does not launch a browser window. This makes it easy to run Taiko in containers (ex. Docker). To view the browser when the script executes use

    $ taiko googlesearch.js --observe
    

    Taiko’s REPL also documents all the API’s. To view all available API’s use the special command .api

    $ taiko
    Version: 0.2.0 (Chromium:69.0.3476.0)
    Type .api for help and .exit to quit
    > .api
    Browser actions
        openBrowser, closeBrowser, client, switchTo, setViewPort, openTab, closeTab
    ...
    

    To see more details of an API along with examples use

    >.api openBrowser
    
    Launches a browser with a tab. The browser will be closed when the parent node.js process is closed.
    
    Example:
        openBrowser()
        openBrowser({ headless: false })
        openBrowser({args:['--window-size=1440,900']})
    

    Smart Selectors

    Taiko’s API treats the browser as a black box. With Taiko we can write scripts by looking at a web page and without inspecting it’s source code For example on google.com the command

    > click(“Google Search”)
    

    clicks on any element with the text Google Search (a button on the page at https://google.com). Taiko’s API mimics user interactions with the browser. For example if you want to write into an element that’s currently in focus use

    > write(“something”)
    

    Or if you want to write into a specific text field

    > write(“something”, into(textField({placeholder: “Username”})))
    

    With Taiko’s API we can avoid using ids/css/xpath selectors to create reliable tests that don’t break with changes in the web page’s structure.

    You can also use Taiko’s proximity selectors to visually locate elements. For example

    > click(checkbox(near(“Username”)))
    

    Will click the checkbox that is nearest to any element with the text Username.

    Taiko’s also supports XPath and CSS selectors

    > click($(“#button_id”)) // Using CSS selectors
    > click($(“//input[name=`button_name`]”)) // Xpath selectors
    

    Handle XHR and dynamic content

    Taiko’s API listens to actions that trigger XHR request or fetch dynamic content and automatically waits for them to complete before moving on to the next action. Taiko implicitly waits for elements to load on the page before performing executing the command. Scripts written in Taiko are free of explicit local or global waits and the flakiness.

    Request/Response stubbing and mocking

    Setting up test infrastructure and test data is hard. Taiko makes this easy with the intercept API. For example, block requests on a page (like Google Analytics or any other resource)

    > intercept("https://www.google-analytics.com/analytics.js");
    

    Or redirect an XHR request on the page to a test instance

    > intercept(“https://fetchdata.com”, “http://fetchtestdata.com”)
    

    Or stub an XHR request to return custom data

    > intercept(“https://fetchdata.com”, {“test”: data})
    

    Or even modify data sent by XHR requests

    > intercept(“https://fetchdata.com”, (request) => {request.continue({“custom”: “data”})})
    

    This simplifies our test setups as we don’t have to set up mock servers, or replace url’s in tests to point to test instances.

    Integrating with Gauge

    We recommend using Taiko with Gauge. Gauge is a framework for writing readable and reusable acceptance tests. With features like markdown specifications, data driven execution, parallel execution and reporting Gauge makes test maintenance easy. Gauge is easy to install and well integrated with Taiko. With Gauge and Taiko we can write reliable acceptance tests.

    Install Gauge using npm and initialize an initialize and sample Taiko project using

    $ npm install @getgauge/cli
    $ gauge init js
    

    Learn more about Gauge!

    Documentation

    Visit original content creator repository https://github.com/NikitaRadzkov/gauge-taiko-ts-template
  • govchat

    Visit original content creator repository
    https://github.com/USEPA/msft-chatbot-ui

  • Good-Choices-Club-video-game-

    Good-Choices-Club

    Summary:

    Good Choices Club is an educational based game, to help and teach kids what is allowed and not allowed for their age. The game is based on squares that has cards under, which can be turned over to reveal different objects, exp. animals, nature, healthy/bad foods, sports, good manners etc.

    How to play the game:

    1- At the main page the player has to press start button to launch the game and the cards.

    2- The player has to match the cards according to their subject, The cards refers to (Good/Bad) choices, each “Good to do” card matches with “Bad to do”.

    3- When the cards match, the player gain a point (Card guessed) and a box will pop up with information related to why it’s good/bad along with a fun fact about the “Good choice”

    4- The game is a win-win game, the player will never lose. The game doesn’t have a timer or losing posibility. when the 20 cards are guessed the player WIN. “Kids should not lose”

    Installation:

    To run the game, scan the QR code below of follow the link directly.

    Direct link: https://frost962.github.io/Good-Choices-Club-video-game-/

    QR code:

    qr code  

    Tools used in this game:

    • DOM selection
    • DOM manipulation
    • Callback function
    • HTML
    • CSS

    Visit original content creator repository
    https://github.com/Frost962/Good-Choices-Club-video-game-

  • notes4free

    notes4free.in

    Engineering,BCA,B.Com,M.Com,Mca notes For All University
    notes4free(http://notes4free.in/)
    notes4free this platform, Students can get all kinds of notes for courses such as Vtu Engineering(CBCS and Non-CBCS), b.com, BCA, mca, b.tech, etc. and students can also get regular semester projects based on web development and other domain projects, including all types of software projects. Model paper and question paper from the previous year are also available to help the students score more.

    Engineering Notes
    Notes4free provides all department notes under new scheme and syllabus of VTU CBCS & Non-CBCS Engineering notes and that is mainly intended for students who are studying under the new CBCS and Non-CBCS VTU scheme. Often we update more VTU CBCS scheme notes of all departments of engineering including study materials. To download please click here.http://notes4free.in/

    BCA
    notes4free offers BCA departmental notes for the students studying in the new BCA Scheme and the 3-year curriculum from the first sem to the sem of BCA. We frequently add more BCA notes and study materials on a regular basis. To download, click here http://notes4free.in/

    B.Com
    Notes4free offers B.Com notes and this is given under the new B.Com scheme and curriculum. We add more B.com notes and study materials on a regular basis. To download, click here.http://notes4free.in/

    M.Com
    Notes4free provides M.com department notes and this is provided to students studying under the new M.Com scheme and syllabus. More M.Com notes and study materials are added regularly. To download, click here.http://notes4free.in/

    Vtu Engineering software projects

    VTU software projects based on python, web-based development, graphics design, and other software where you pay for certain projects, and some are not paid means its free to download. if you have an error during the execution of the projects then you must contact the admin on the contact page or in live chat to admin. And for enquires for any projects, you can join and register in a live chat with proper email and contact to admin@gmail.com

    Web development http://notes4free.in/vtu-project.html
    Computer Graphics design or cg project http://notes4free.in/vtu-project.html
    DBMS project http://notes4free.in/vtu-project.html
    final year project http://notes4free.in/vtu-project.html
    Php project http://notes4free.in/vtu-project.html

    BCA NOTES FOR ALL YEAR

    notes4free provides bca notes and this are given to students studying under bca of all semester. We regularly add more bca notes and study materials choose the department and semester of the notes and click download to download the notes.

    B.Com NOTES FOR ALL YEAR
    notes4free provides B.Com notes and this are given to students studying under B.Com of all semester. We regularly add more B.Com notes and study materials choose the department and semester of the notes and click download to download the notes
    http://notes4free.in/bcom-notes.html

    M.Com NOTES FOR ALL BRANCHES | M.Com Specialisations

    notes4free provides M.Com department notes and this are given to students studying under the new scheme and syllabus. We regularly add more SCHEME M.com department notes and study materials choose the department and semester of the notes and click download to download the notes. http://notes4free.in/mcom-notes.html

    contact us
    For any queries, please feel free to contact us, and if any student needs notes tell us and we’ll add notes to notes4free.
    http://notes4free.in/contact.html

    Visit original content creator repository
    https://github.com/nikhilkeshava/notes4free

  • euro-python-2023

    pde

    Neovim: your personalized development environment (pde) for Python

    Overview

    As developers continue to embrace Python for their projects, the need for a powerful, flexible, and efficient development environment has become increasingly important. Neovim is an open-source text editor designed to enhance the traditional Vim editor, providing a modern, extensible, and highly configurable tool for developers.

    In this context, using Neovim as a Python development environment offers numerous benefits, such as keyboard driven development, streamlined workflows, and a range of plugins and extensions to enhance productivity. Neovim’s modular architecture allows for customization, automation, and integration with other tools and frameworks.

    The goal of this repo is to set you up with a minimal Neovim configuration with the beloved features like Python language support, autocompletion, testing, file navigation, among others.

    Requirements

    Project Structure

    • hpsort: example Python project to test editor functionality
    • nvim: base configuration that is loaded in the container

    Usage

    # Run the container environment
    make run
    
    # Start neovim which install plugins and then exit out with `:qa`
    ⬢ [Docker] nvim
    
    # Start neovim again - You should be fully setup!
    ⬢ [Docker] nvim

    Checkout nvim README to find out more about the configuration structure and available keybinds.

    Debugging

    • Spawning language server with cmd: pyright-langserver failed. The language server is either not installed, missing from PATH, or not exeecutable.: sometimes the language server is not completely setup. So run :Mason command to prompt installation. After the tools are installed, you can hit q to quit.

    Visit original content creator repository
    https://github.com/logan-connolly/euro-python-2023

  • skeleton

    :package_name

    Latest Version on Packagist Software License Total Downloads Code Coverage Build Status

    Note: Replace :author_name :author_username :author_website :author_email :vendor :package_name :package_description with their correct values in README.md, CHANGELOG.md, CONTRIBUTING.md, LICENSE.md and composer.json files, then delete this line. You can run $ php prefill.php in the command line to make all replacements at once. Delete the file prefill.php as well.

    This is where your description should go. Try to limit it to a paragraph or two, and maybe throw in a mention of what PSRs you support to avoid any confusion with users and contributors.

    Structure

    If any of the following are applicable to your project, then the directory structure should follow industry best practices by being named the following.

    bin/
    build/
    docs/
    config/
    src/
    tests/
    vendor/
    

    Install

    Via Composer

    $ composer require :vendor/:package_name

    Usage

    $skeleton = new spaceonfire\Skeleton\SkeletonClass();
    echo $skeleton->echoPhrase('I\'m on fire!');

    Change log

    Please see CHANGELOG for more information on what has changed recently.

    Testing

    $ composer test

    Contributing

    Please see CONTRIBUTING and CODE_OF_CONDUCT for details.

    Security

    If you discover any security related issues, please email :author_email instead of using the issue tracker.

    Credits

    License

    The MIT License (MIT). Please see License File for more information.

    Visit original content creator repository https://github.com/spaceonfire/skeleton
  • CATMAID

    CATMAID

    The Collaborative Annotation Toolkit for Massive Amounts of Image Data

    For more information, see http://www.catmaid.org/

    Status

    This reflects the status of our tests:

    CI Coverage Status

    Releases

    Versions that we consider stable are tagged as release and are merged into the repository’s master branches. These versions are additionally available as bundled download.

    Development

    We follow a development model that borrows ideas from GitFlow, but is less strict. Regular development happens in the dev branch or topic branches that are later merged into dev. Release branches are created off of dev and contain additional release preparation changes. When ready, a release commit is tagged and then merged into master and dev. In case a release requires additional fixes maintenance branches are created based on the respective release commits. Maintenance branches are considered stable and are merged into both master and dev.

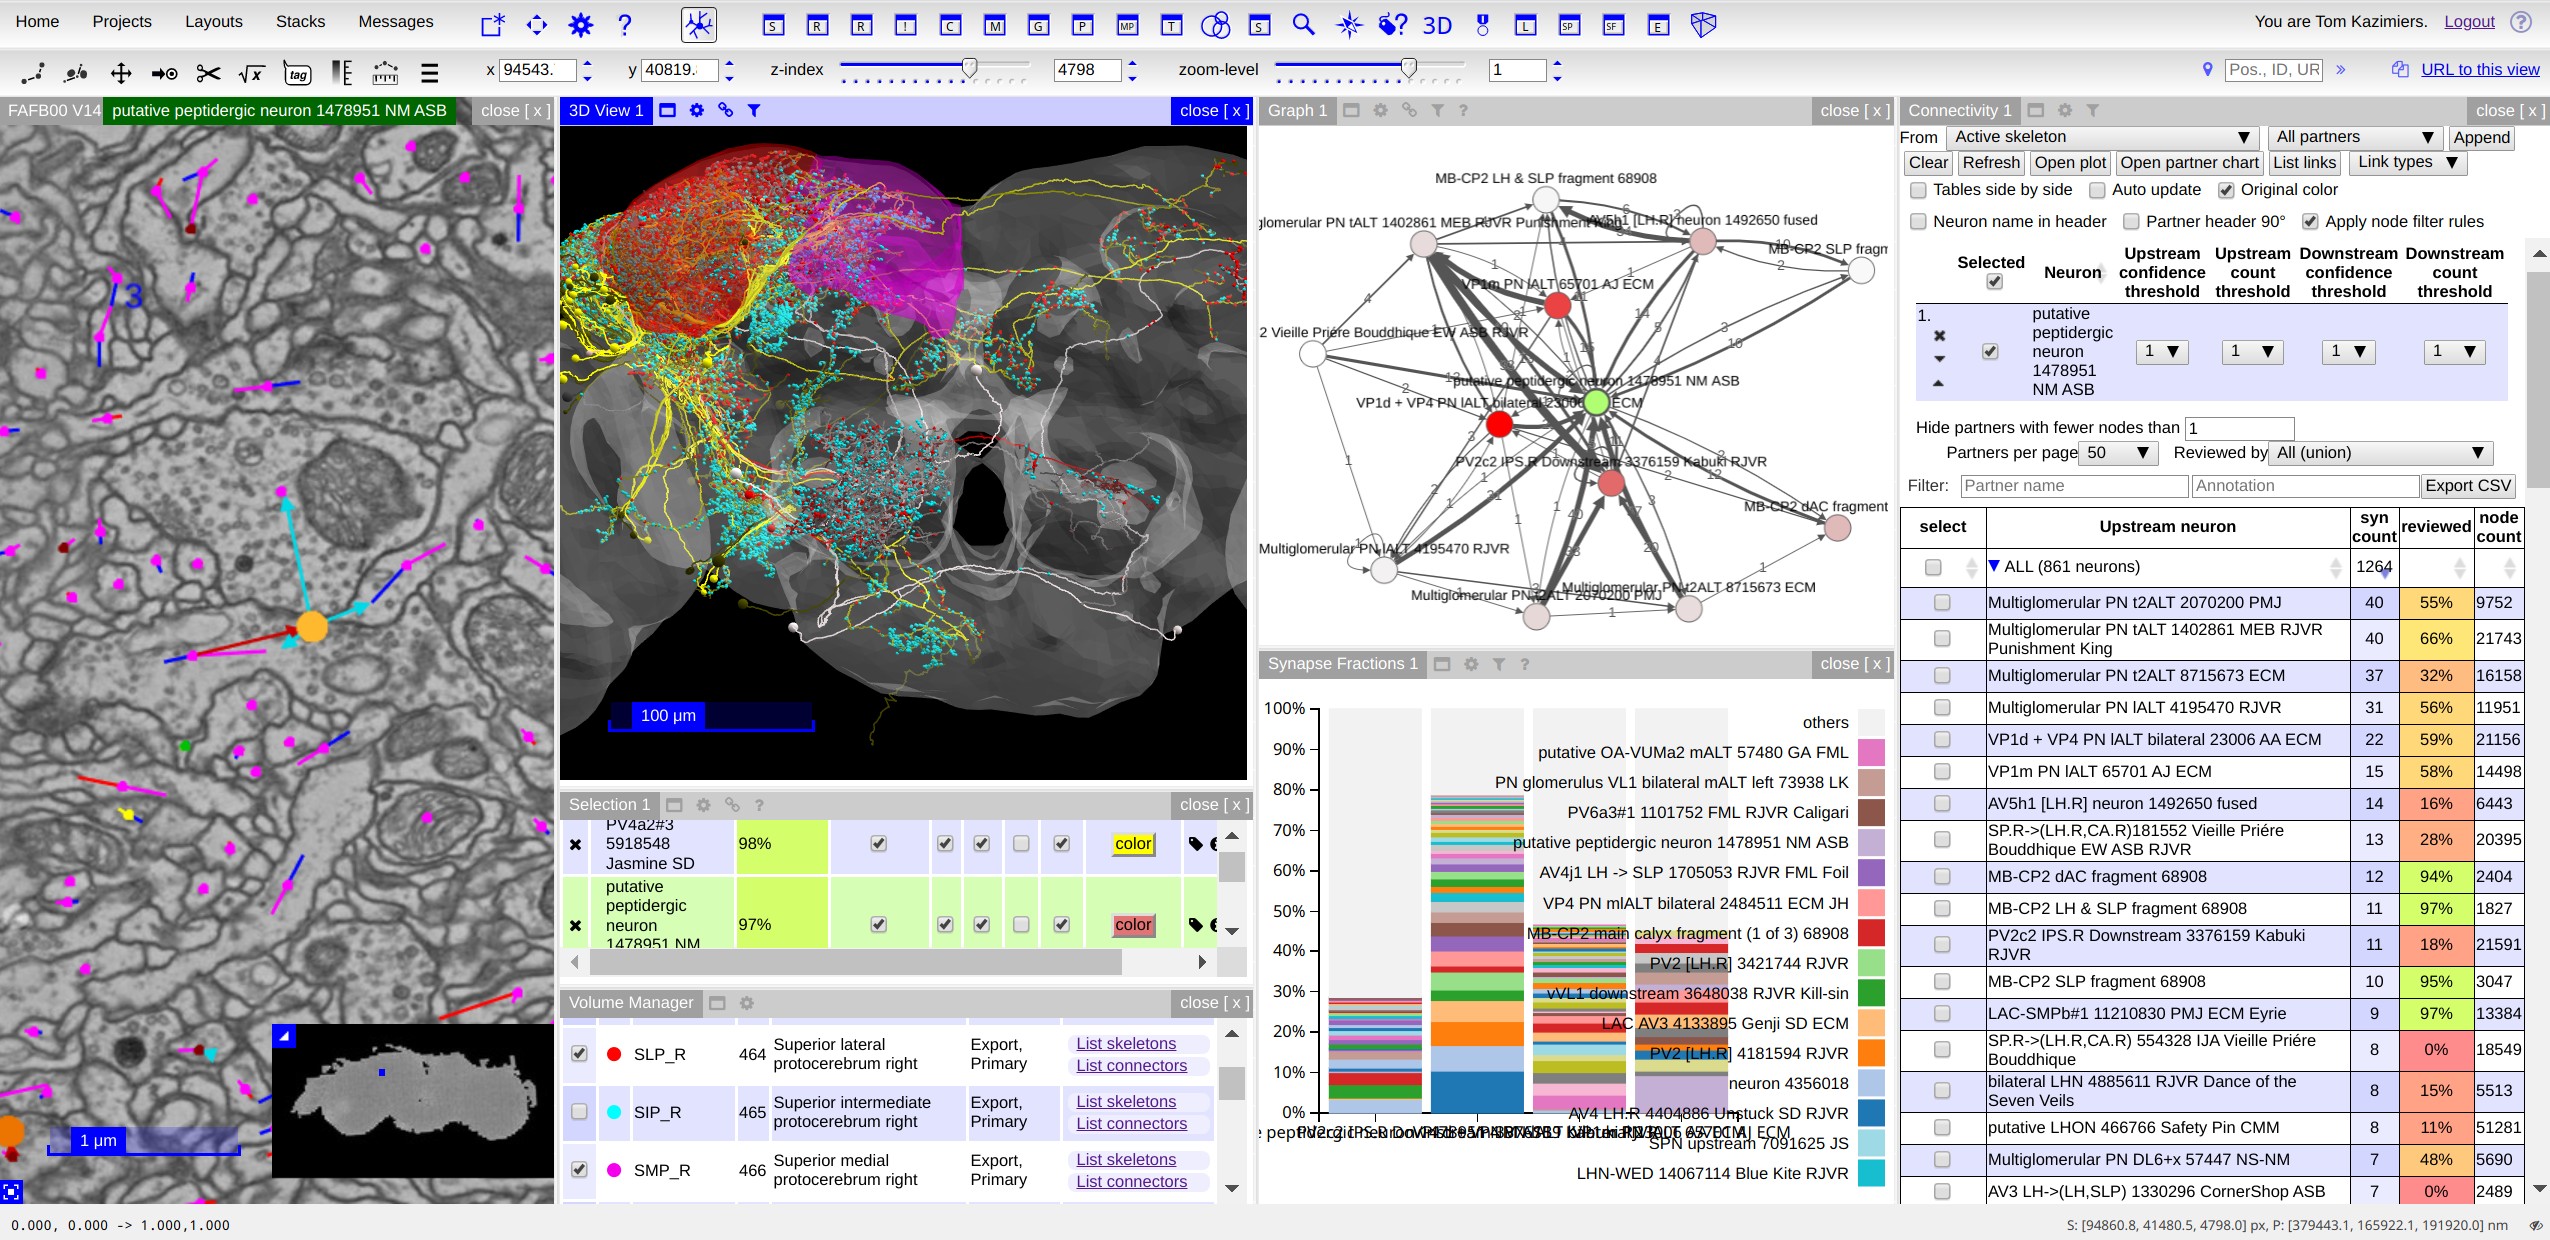
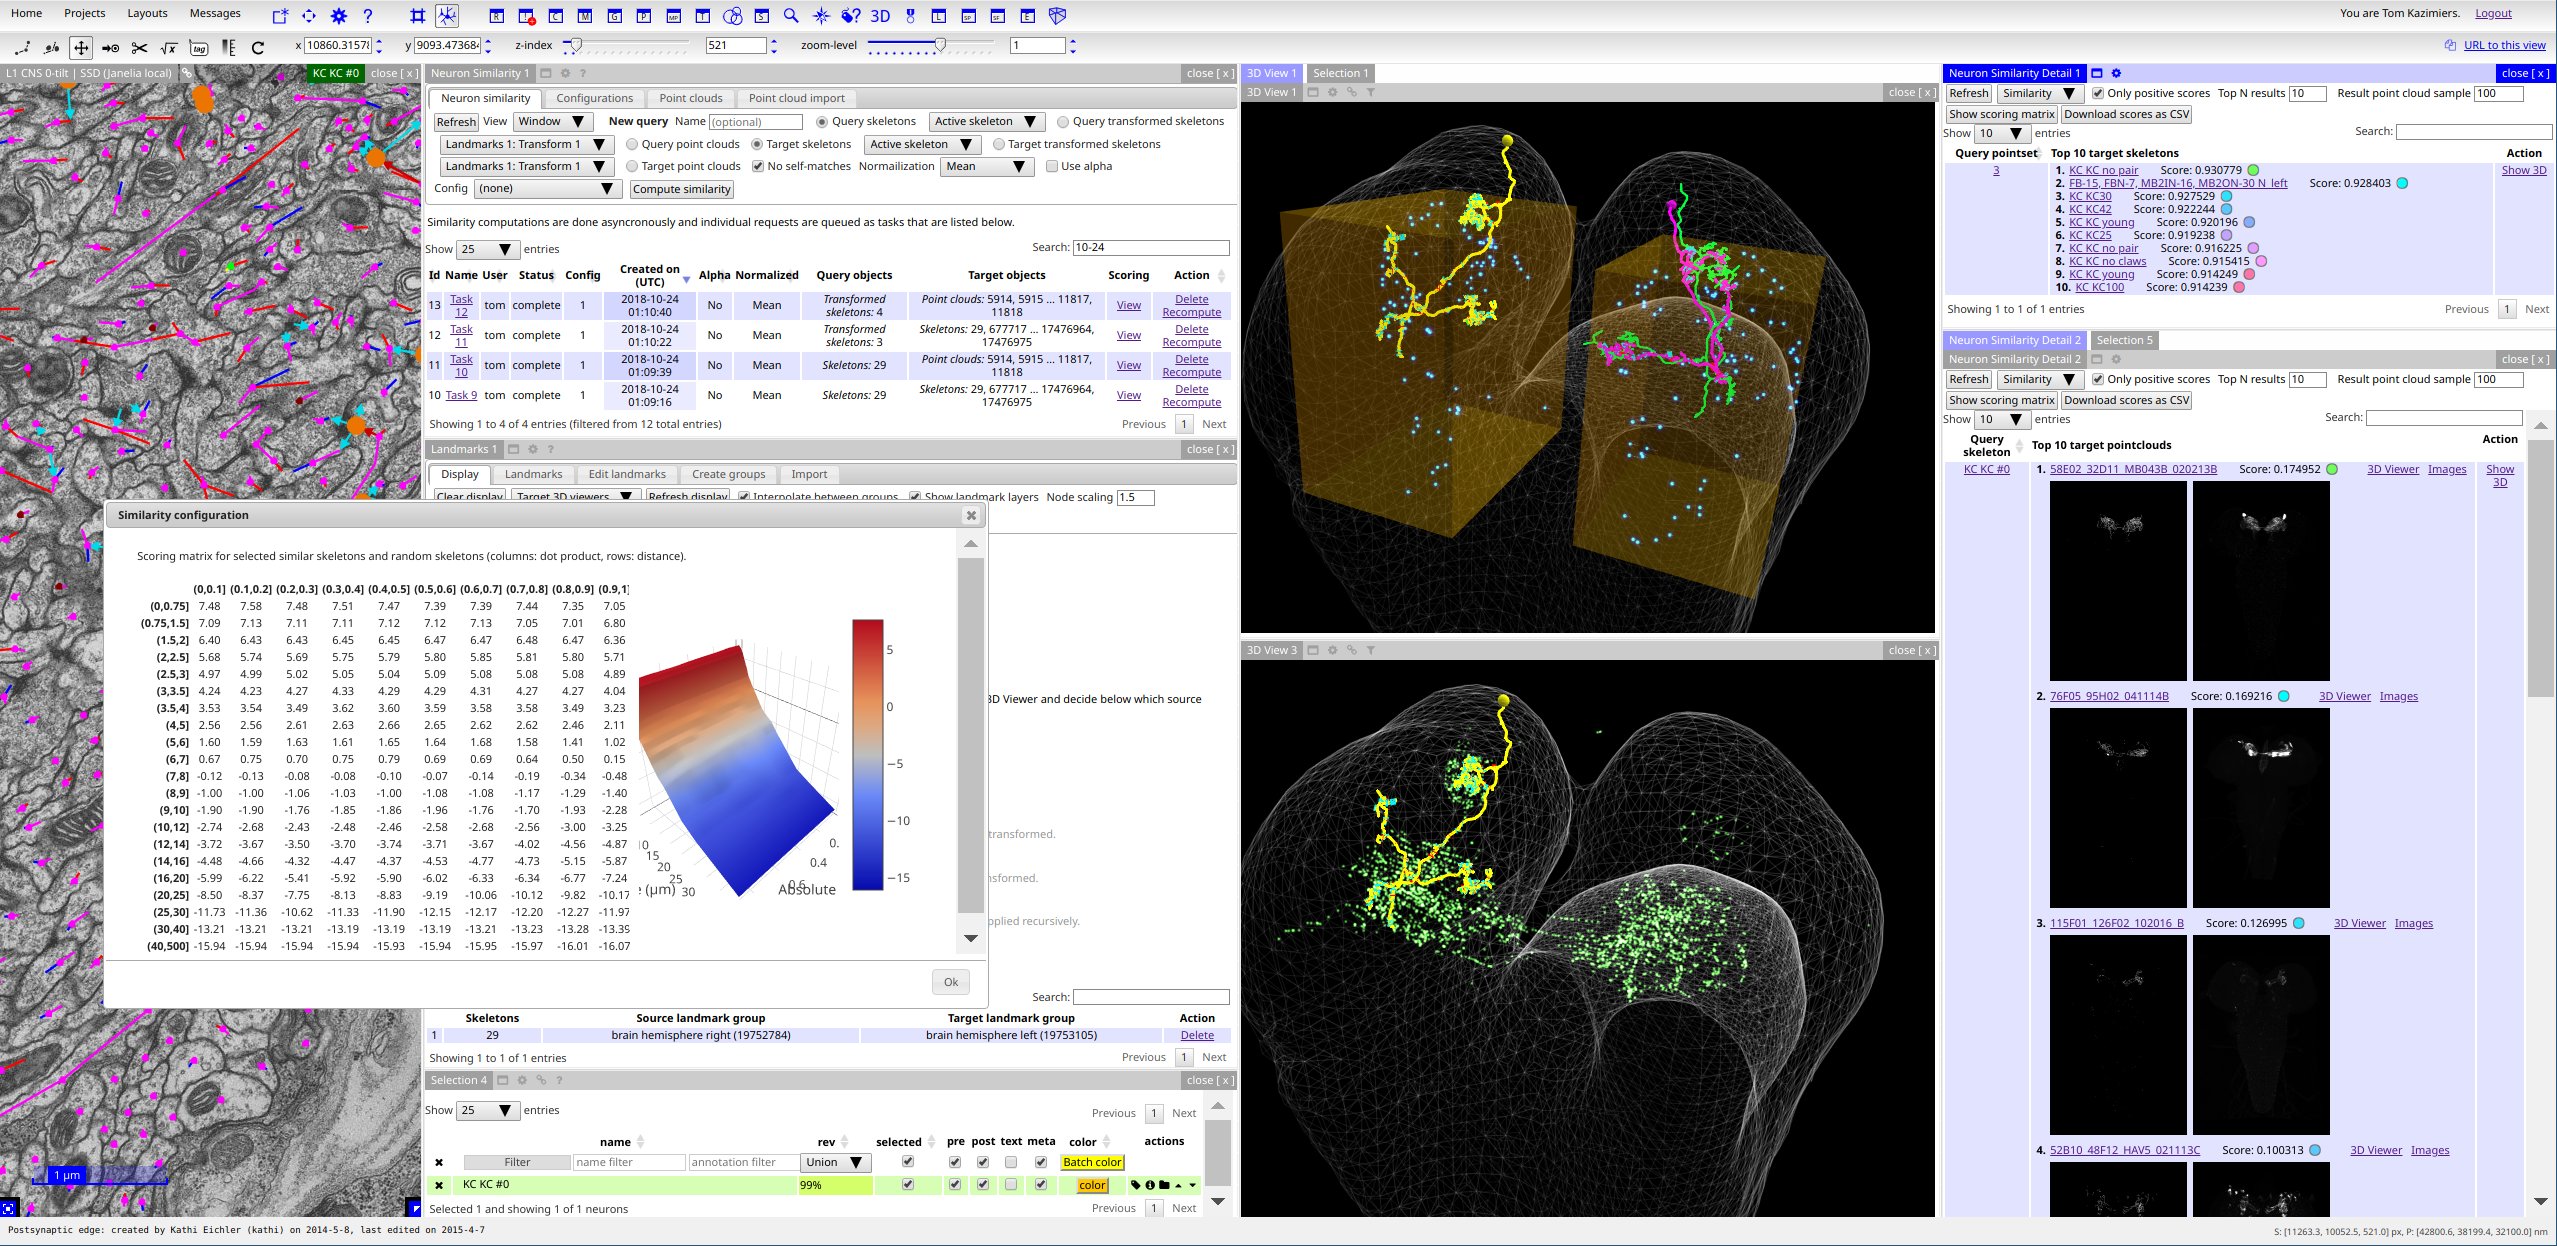
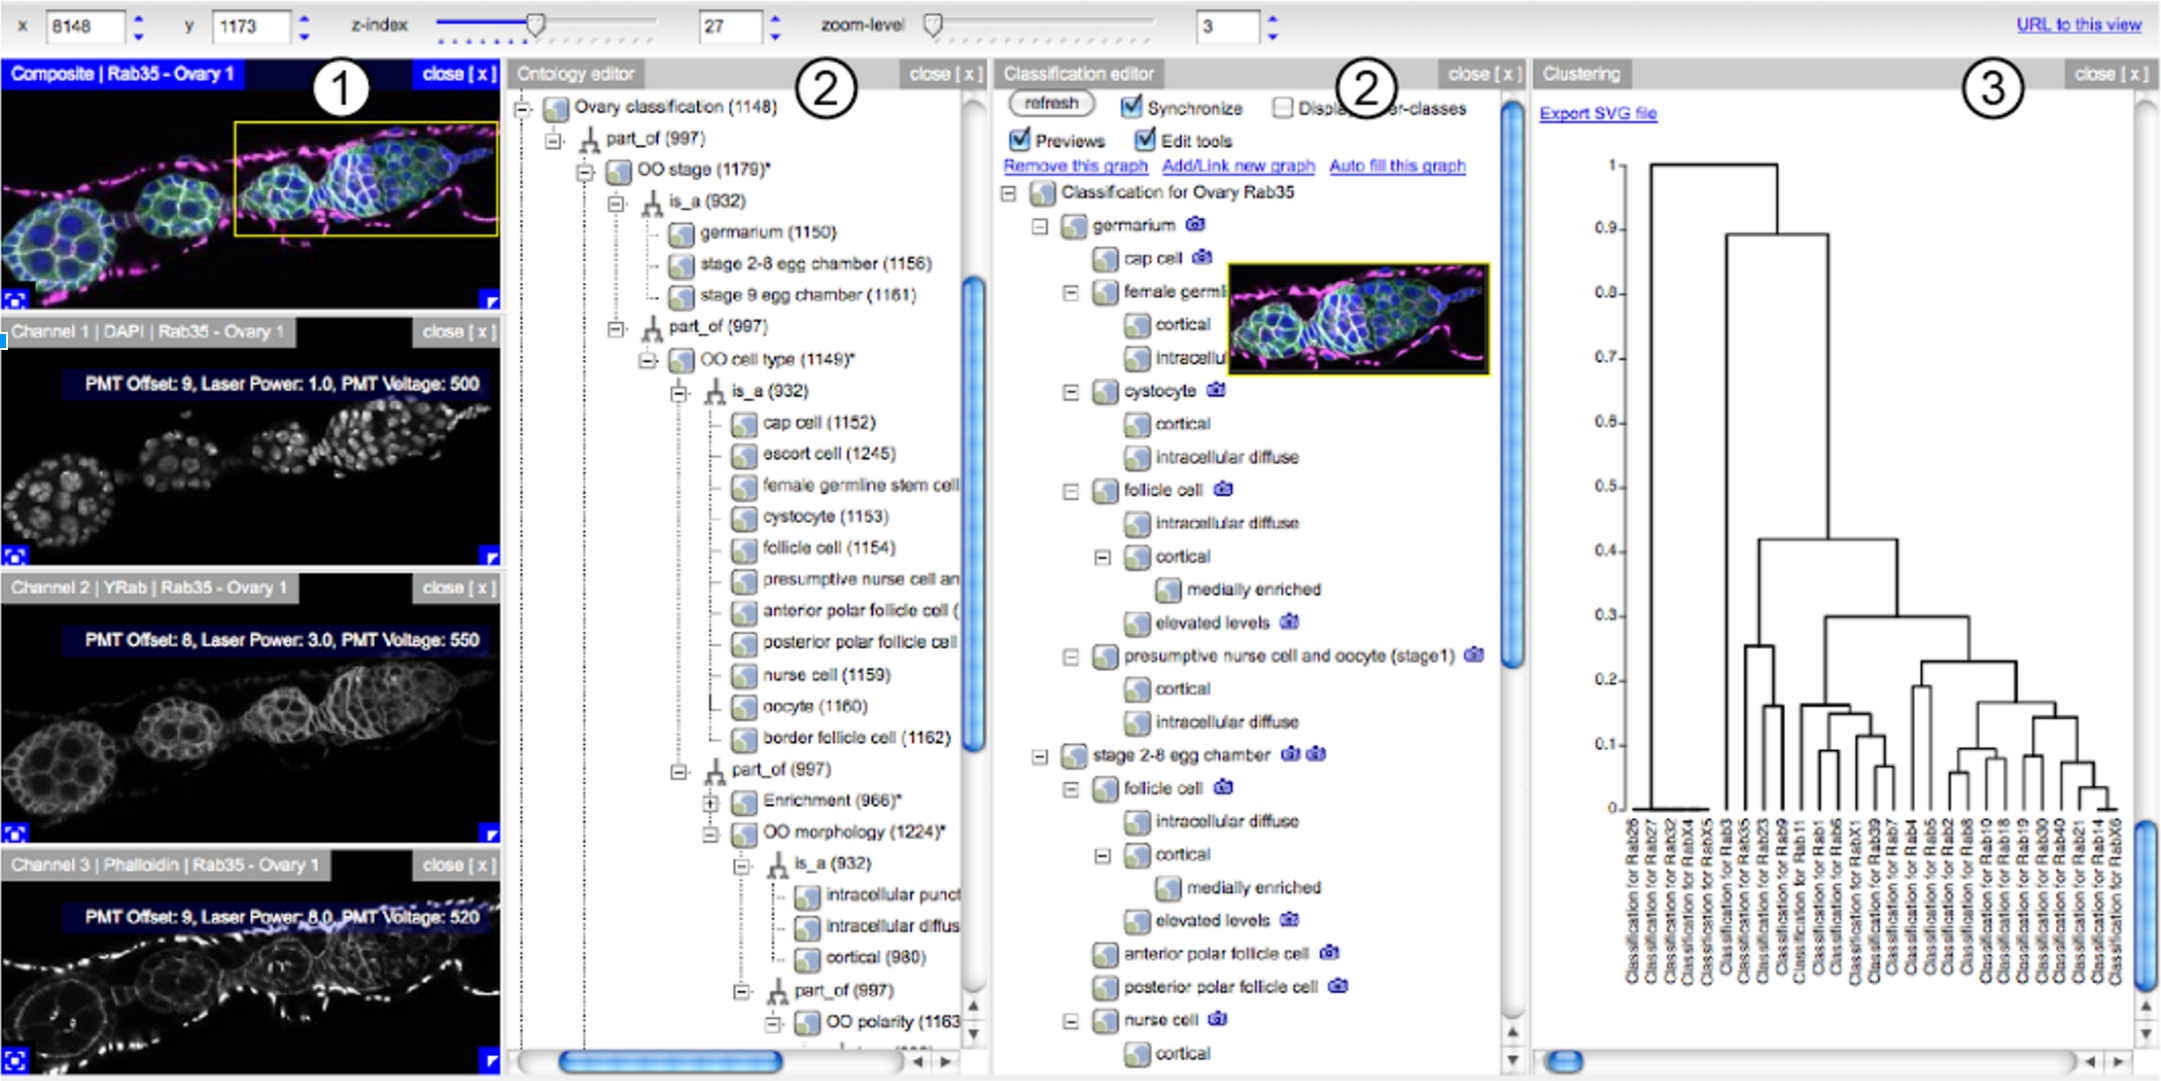
    Screenshots

    CATMAID’s neuron tracing and analysis environment in the FAFB Drosophila dataset:

    Image of CATMAID's neuron tracing and analysis environment in the FAFB Drosophila dataset

    CATMAID’s neuron tracing environment and NBLAST similarity analysis in the L1 Drosophila dataset:

    Image of CATMAID's neuron tracing environment and NBLAST similarity analysis in the L1 Drosophila dataset

    Drosophila multi-channel light data with different ontology annotation and analysis tools:

    Image of Drosophila light data and different ontology annotation and analysis tools

    Visit original content creator repository https://github.com/catmaid/CATMAID
  • DJANGO-WEATHER-MUSIC

    WEATHER SPOTIFY

    Music based on the weather and the most popular news in your country.

    This application allows you to check actuall weather and give a random playlist on spotify based on weather. You also check the most popular news in your country.
    For more content you can register to the newsletter to get weakly interesting informations.

    Technology that I used:

    • Python (Django)
    • HTML & BOOTSTRAP & CSS
    • PostgreSQL
    • Docker
    • APIs:
      • Spotify API
      • Openweather API
      • Geolocation API
      • NEWS API

    Demo

    Documentation

    1. Clone the repository
    git clone <link>
    1. Install requirements
    pip intall -r requirements.txt
    1. .env

    Inside direction “weathermusic” where settings.py is located you need to create file called “.env” and paste this:

    SECRET_KEY=<DJANGO SECRET KEY>
    EMAIL=<YOUR GMAIL EMAIL ADDRESS>
    PASSWORD=<YOUR GMAIL PASSWORD>
    CLIENT_ID=<TO YOUR SPOTIFY ACCOUNT>
    CLIENT_SECRET=<TO YOUR SPOTIFY ACCOUNT>
    AUTH_URL=https://accounts.spotify.com/api/token
    WEATHER_KEY=<API KEY FROM OPENWEATHERMAP>
    GEOLOCATION_KEY=<API KEY FROM IPGEOLOCATION>
    NEWS_KEY=<API KEY FROM NEWSAPI>
    1. Make migrations
    py manage.py makemigrations
    py manage.py migrate
    1. Create superuser
    py manage.py createsuperuser

    Newsletter:

    To send newsletter you need to be registered on admin account.
    Then go to url /newsletter/send and you can write an email.

    License

    MIT

    Visit original content creator repository https://github.com/DEENUU1/DJANGO-WEATHER-MUSIC