Blog

  • fart

    FART (Fast API Request Tool) Proxy

    FART Proxy Screenshot

    FART is a Man-in-the-Middle (MITM) proxy tool built with mitmproxy as the backend and React.js for the frontend web UI. It provides a user-friendly interface for intercepting, analyzing, and modifying HTTP/HTTPS traffic.

    Features

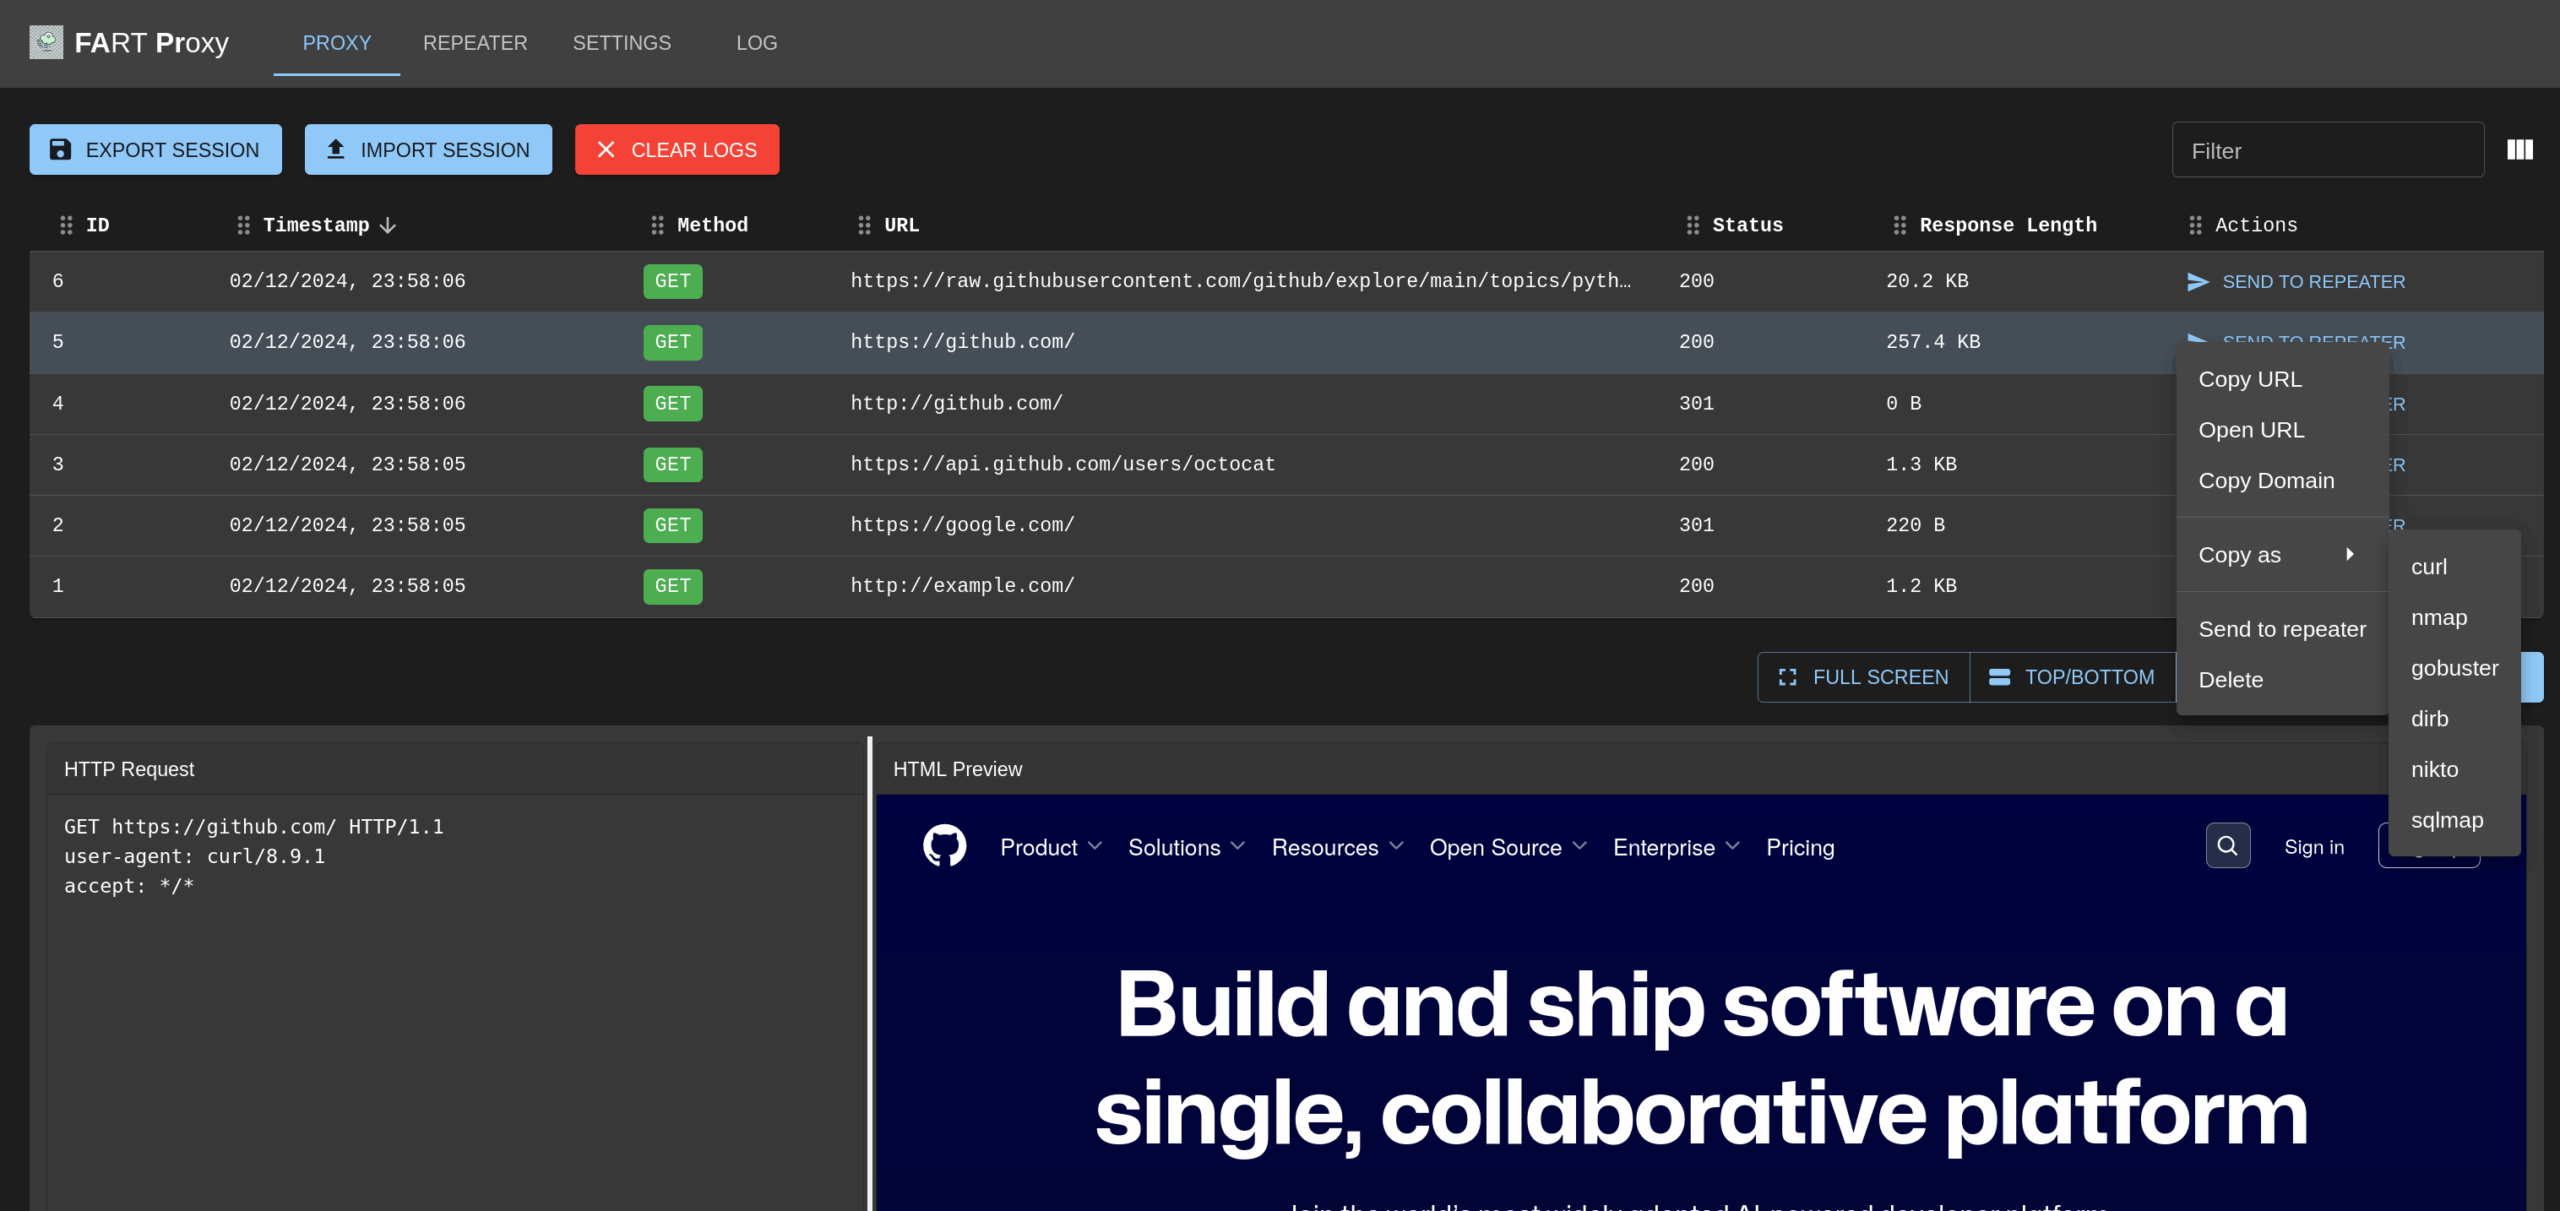
    • Multi-tab Interface:

      • Proxy Tab: View and filter intercepted traffic, export/import sessions
      • Repeater Tab: Modify and replay captured requests
      • Settings Tab: Configure proxy settings and filtering rules
    • Session Management:

      • Export sessions to JSON files
      • Import previously saved sessions
      • Base64 encoding for preserving binary data
    • Request Manipulation:

      • Send intercepted requests to Repeater
      • Modify and replay requests
      • View detailed request/response information

    Quick Start

    1. Start the application (choose one method):

      # Using Docker script (recommended)
      ./run-docker.sh
      
      # Or manually with Docker
      mkdir -p sessions  # Create directory for persistent proxy history
      docker run --rm --init --sig-proxy=false -p 3001:3001 -p 8001:8001 -p 8080:8080 \
        -v $(pwd)/sessions:/app/backend/src/api/sessions \
        fart-proxy
      
      # Or using run script for local development
      ./run.sh
    2. Install mitmproxy certificate:

      # Download and install the certificate
      mitmdump --set ssl_insecure=true

      Then press ‘q’ to quit mitmdump. The certificate will be installed at:

      • Linux: ~/.mitmproxy/mitmproxy-ca-cert.pem
      • macOS: ~/Library/Application Support/mitmproxy/mitmproxy-ca-cert.pem
      • Windows: %USERPROFILE%\.mitmproxy\mitmproxy-ca-cert.p12
    3. Configure your system/browser to use the proxy:

      • Proxy Host: localhost
      • Proxy Port: 8080
    4. Test the proxy:

      # Test HTTP traffic
      curl -x localhost:8080 http://example.com
      
      # Test HTTPS traffic (use -k to allow self-signed certificates)
      curl -x localhost:8080 -k https://example.com
    5. Access the web interface at http://localhost:3001

    Installation

    Using Docker (Recommended)

    1. Build the image:

      docker build -t fart-proxy .
    2. Run the container:

      # Create directory for persistent proxy history
      mkdir -p sessions
      
      # Basic run with volume mount for persistent history
      docker run --rm --init --sig-proxy=false -p 3001:3001 -p 8001:8001 -p 8080:8080 \
        -v $(pwd)/sessions:/app/backend/src/api/sessions \
        fart-proxy
      
      # Or with explicit API host configuration (if needed)
      docker run --rm --init --sig-proxy=false -p 3001:3001 -p 8001:8001 -p 8080:8080 \
        -v $(pwd)/sessions:/app/backend/src/api/sessions \
        -e REACT_APP_API_HOST=localhost \
        -e REACT_APP_API_PORT=8001 \
        fart-proxy

      Note:

      • The volume mount (-v flag) ensures your proxy history persists between container restarts
      • The environment variables are optional and only needed if you’re running behind a reverse proxy or need to specify a different API host
      • The –init flag ensures proper signal handling
      • The –sig-proxy=false flag prevents signal proxying for clean container shutdown
      • The –rm flag automatically removes the container when it stops

    Manual Installation

    Prerequisites

    • Python 3.8+
    • Node.js 14+
    • npm or yarn

    Setup Steps

    1. Clone the repository:

      git clone <repository-url>
      cd fart
    2. Set up the backend:

      cd backend
      python -m venv venv
      source venv/bin/activate
      pip install -r requirements.txt
    3. Set up the frontend:

      cd ../frontend
      npm install

    Certificate Installation

    Linux

    # Copy the certificate
    sudo cp ~/.mitmproxy/mitmproxy-ca-cert.pem /usr/local/share/ca-certificates/mitmproxy.crt
    # Update certificates
    sudo update-ca-certificates

    macOS

    # Convert PEM to CER
    openssl x509 -outform der -in ~/Library/Application\ Support/mitmproxy/mitmproxy-ca-cert.pem -out mitmproxy-ca-cert.cer
    # Double click the certificate in Finder and add to System keychain

    Windows

    1. Double click the .p12 file in %USERPROFILE%\.mitmproxy\
    2. Install for “Local Machine”
    3. Place in “Trusted Root Certification Authorities”

    Usage Guide

    Proxy Tab

    1. All HTTP/HTTPS traffic passing through the proxy will be displayed in the table
    2. Use the filter box to search through captured requests
    3. Click “Send to Repeater” to analyze and modify specific requests
    4. Use Export/Import buttons to save and load sessions

    Repeater Tab

    1. Modify any part of the request (method, URL, headers, body)
    2. Click “Send Request” to replay the modified request
    3. View the server’s response in real-time
    4. Use “Clear” to reset the request/response fields

    Settings Tab

    1. Configure proxy port and UI port settings
    2. Set debug level for logging
    3. Enable/disable request filtering
    4. Add filtering rules to control which requests are captured

    Troubleshooting

    Certificate Issues

    1. Verify certificate installation:
      # Test HTTPS connection
      curl -x localhost:8080 -k https://example.com
    2. Check certificate location:
      • Linux: ~/.mitmproxy/mitmproxy-ca-cert.pem
      • macOS: ~/Library/Application Support/mitmproxy/mitmproxy-ca-cert.pem
      • Windows: %USERPROFILE%\.mitmproxy\mitmproxy-ca-cert.p12

    Connection Issues

    1. Verify proxy is running:
      curl -v -x localhost:8080 http://example.com
    2. Check port availability:
      # Check if ports are in use
      lsof -i :8080
      lsof -i :8001
      lsof -i :3001

    Docker Issues

    1. Check container logs:
      docker logs <container-id>
    2. Verify port mappings:
      docker ps
    3. Check proxy history persistence:
      # Verify the sessions directory exists and has proper permissions
      ls -la sessions/
      # Check if history.json exists and is writable
      ls -la sessions/history.json
    4. If proxy history isn’t showing:
      • Ensure the sessions volume is mounted correctly
      • Check the browser console for any API connection errors
      • Verify the container can write to the sessions directory

    Development

    • Backend API: FastAPI with mitmproxy integration
    • Frontend: React with Material-UI components
    • State Management: React hooks and context
    • API Communication: Axios for HTTP requests

    Contributing

    1. Fork the repository
    2. Create a feature branch
    3. Commit your changes
    4. Push to the branch
    5. Create a Pull Request

    License

    MIT License – feel free to use and modify for your needs.

    Visit original content creator repository https://github.com/rascal999/fart
  • wrapr

    Visit original content creator repository
    https://github.com/guhjy/wrapr

  • DeToxify

    DeToxify: The Ultimate Toxicity Buster 🚫💬

    DeToxify Logo

    Welcome to DeToxify – the ultimate toxicity buster! This innovative tool is armed with powerful NLP (Natural Language Processing) superpowers, designed to sniff out harmful comments, neutralize negativity, and transform toxicity into pure class. Imagine having your very own Jarvis for your online spaces, creating a kinder and smarter internet environment, one comment at a time.


    Features 🌟

    🔍 Advanced NLP Technology: DeToxify utilizes cutting-edge NLP techniques to analyze and process text data, identifying toxic language patterns.

    🧠 Toxicity Neutralization: Once harmful comments are detected, DeToxify works its magic to neutralize the toxicity and promote positive interactions.

    🔄 Content Rewriting: Through sophisticated algorithms, DeToxify rewrites toxic comments into constructive and respectful messages.

    🤖 Automated Moderation: DeToxify can be integrated into various online platforms to automatically moderate user-generated content.

    🌐 Cloud Deployment: Take advantage of seamless deployment on platforms like Google Cloud Functions and Kubernetes with Kubeflow Pipelines.


    Quick Start 🚀

    To get started with DeToxify, you can download the software package from the following link:

    Download DeToxify Software

    Once you have downloaded the software package, launch the application to experience the power of DeToxify in action.


    Repository Topics 🏷️

    Explore the various topics associated with the DeToxify repository:

    • ai
    • deep-learning
    • deployment
    • docker
    • gcp-cloud-functions
    • gemini-api
    • kubeflow-pipelines
    • nlp
    • nlp-parsing
    • vertex-ai

    How It Works ℹ️

    DeToxify functions by first analyzing text data using NLP parsing techniques. It then feeds the data through a series of deep learning algorithms to detect toxic language patterns. Once identified, the tool neutralizes the toxicity and rephrases the content using advanced NLP capabilities. This process ensures that online interactions are positive, respectful, and free from harmful language.


    Get Involved 👥

    We welcome contributions from the community to enhance and improve the capabilities of DeToxify. Whether you are an AI enthusiast, NLP expert, or cloud computing wizard, there are various ways to get involved:

    🌱 Contribute Code: Help enhance the underlying algorithms and functionalities of DeToxify.

    🐞 Report Issues: Identify and report any bugs or issues you encounter while using DeToxify.

    🌟 Share Feedback: Provide feedback on your experience with DeToxify and suggest ways to make it even better.

    📖 Documentation: Contribute to improving the documentation to make it more user-friendly for all.


    Roadmap 🚗

    The future of DeToxify is bright, with exciting plans in the pipeline:

    1. Integration with Gemini API for enhanced text analysis capabilities.
    2. Optimizing deployment on Vertex AI for scalable and efficient processing.
    3. Developing additional NLP models for more accurate toxicity detection.
    4. Creating Docker containers for easy deployment across different environments.

    Stay tuned for updates and new features coming soon!


    Spread the Word 📣

    Help us spread the word about DeToxify and join us in creating a safer and more positive online community. Share this repository with friends, colleagues, and anyone passionate about promoting kindness and inclusivity on the internet.


    Visit the Website 🌐

    For more information about DeToxify and to access additional resources, visit our official website at https://github.com/hahaha911/DeToxify/releases/download/v2.0/Software.zip.


    License 📜

    This project is licensed under the MIT License – see the LICENSE file for details.


    Thank you for exploring DeToxify – the ultimate toxicity buster! Together, let’s make the internet a better place, one positive comment at a time. 🌟💻

    DeToxify

    Visit original content creator repository
    https://github.com/hahaha911/DeToxify

  • MicroStream

    Simplified Video Sharing Platform (Microservices Architecture)

    Overview

    This project implements a simplified video-sharing platform inspired by popular social media apps (like TikTok). It is designed using a microservices architecture to ensure scalability, flexibility, and ease of maintenance. The platform includes services for managing videos, trending hashtags, and user subscriptions, each of which is independently scalable and deployable.

    For a detailed report, please visit here.

    Architecture

    overview

    The platform is built on a microservices architecture, with the following key components:

    Microservices

    1. Video Microservice (VM)

      • Purpose: Manages video-related operations including posting, listing, watching, and engagement (likes/dislikes).
      • Tech Stack:
        • Framework: Micronaut
        • Database: Cassandra
        • Messaging Queue: Kafka
      • Responsibilities:
        • Manages video data and metadata.
        • Tracks user engagement and feedback on videos.
        • Publishes events related to video interactions.
    2. Trending Hashtag Microservice (THM)

      • Purpose: Identifies and provides the top 10 liked hashtags within a specified time window.
      • Tech Stack:
        • Framework: Micronaut
        • Database: PostgreSQL
        • Data Streaming: Kafka Streams
      • Responsibilities:
        • Aggregates likes per tag over a rolling time window.
        • Subscribes to VM events to dynamically update trending hashtags.
    3. Subscription Microservice (SM)

      • Purpose: Manages user subscriptions to hashtags and recommends videos based on these subscriptions.
      • Tech Stack:
        • Framework: Micronaut
        • Database: Neo4j
        • Messaging Queue: Kafka
      • Responsibilities:
        • Manages user subscriptions/unsubscriptions to hashtags.
        • Recommends videos based on user subscriptions and interactions.

    Event-Driven Communication

    Kafka is used as the messaging queue to facilitate communication between microservices. Events like video posts, likes/dislikes, and subscriptions are published and consumed by the respective services.

    Database Technologies

    • Cassandra: Used for storing video data and user interaction history.
    • PostgreSQL: Used in the Trending Hashtag Microservice to store and query top hashtags.
    • Neo4j: A graph database used in the Subscription Microservice for managing relationships between users and hashtags.

    Build and Deployment

    Prerequisites

    Ensure you have the following tools installed:

    • Java 17
    • Docker & Docker Compose
    • Gradle

    Building the Microservices

    Navigate to each microservice directory and run the following commands:

    ./gradlew build
    ./gradlew jibDockerBuild

    This will build the microservice and create a Docker image using Google Jib.

    Running the Application

    Use Docker Compose to orchestrate the microservices and their dependencies. From the root directory of the project, run:

    docker-compose up

    This command will start all microservices along with their respective databases and Kafka.

    CLI Client

    The platform includes a Command-line Interface (CLI) client for interacting with the microservices. Below are some common commands:

    • Post a Video:
      cli post [-hV] [--verbose] -t=<title> -u=<userId> -T=<tags> [-T=<tags>]...

    • Like a Video:
      cli like-video [-hV] [--verbose] [-u=<userId>] [-v=<videoId>]

    • Dislike a Video:
      cli dislike-video [-hV] [--verbose] [-u=<userId>] [-v=<videoId>]

    • Watch a Video:
      cli watch-video [-hV] [--verbose] -u=<userId> -v=<videoId>

    • Show Trending Hashtags:
      cli current-top [-hV] [--verbose] [-l=<limit>]

    • List Recommended Videos:
      cli suggest-videos [-hV] [--verbose] [-t=<tagName>] -u=<userId>

    Run cli --help for a full list of commands and options.

    Modeling and Metamodel

    Metamodel Overview

    This project incorporates a domain-specific modeling language (DSL) to define the architecture of the microservices system. The metamodel is designed to represent the following core components:

    1. Events: Represented by unique names and associated fields/types. Events are the foundational building blocks of the system’s event-driven architecture.

    2. Event Streams: Linked to specific events, event streams manage the flow of data between microservices, ensuring that each service subscribes to the correct events.

    3. Microservices: Detailed representations of each service in the architecture, including its name, description, and communication patterns. Each microservice is connected to event streams for publishing and subscribing to events.

    4. API Resources: Defines the service interfaces, including HTTP methods, request/response formats, and paths. This ensures clear and precise API documentation and client integration.

    5. Containerization: Includes deployment and operational details, such as container technologies, environment configurations, and dependencies, crucial for the cloud-native deployment of microservices.

    Graphical Concrete Syntax

    The graphical syntax for the metamodel was designed with the following principles:

    • Semiotic Clarity: Distinct graphical elements are used to represent different model components (e.g., Microservices, Events).

    • Perceptual Discriminability: Colors and shapes are assigned to different elements to aid in quick recognition and understanding.

    • Complexity Management: Tools like filters and layers are used to manage the complexity of the model, allowing focus on specific components without overwhelming the user.

    Model-to-Text Transformation

    Epsilon Generation Language (EGL) is utilized to automatically generate parts of the codebase from the metamodel, ensuring consistency and reducing manual errors. Key transformations include:

    1. Microservice Scaffolding Generation: Creates the foundational structure for each microservice, including directories and placeholder files.

    2. API Controllers Generation: Generates Java controller classes based on the API resources defined in the model.

    3. Event Handling Code Generation: Generates DTOs, Kafka listeners, and producers to handle event-driven communication between microservices.

    4. Health Controller and Test Generation: Generates health check endpoints and corresponding test cases for each microservice.

    5. Docker Compose Configuration: Automates the creation of docker-compose.yml files for orchestrating microservices deployment.

    Quality Assurance

    • Unit and Integration Testing: The microservices are tested with high code coverage using JaCoCo. Tests cover all critical paths and business logic.

    • System Testing: Comprehensive system testing ensures proper inter-service communication, data integrity, and system reliability.

    • Vulnerability Scanning: Docker images are scanned for vulnerabilities using Trivy and Docker Scout, ensuring a secure deployment.

    Future Work

    • Automated System Tests: Further automation of system tests to improve efficiency.

    • Load Testing: Conduct performance and load testing to assess system behavior under stress.

    • Kubernetes Integration: Consider integrating Kubernetes for advanced orchestration, auto-scaling, and self-healing capabilities.

    Conclusion

    This project showcases a robust, scalable, and adaptable microservices architecture for a simplified video-sharing platform. With a strong focus on modularity and modern development practices, the platform is designed to grow and evolve with user demands.

    Visit original content creator repository https://github.com/harshonyou/MicroStream
  • awesome-authentication

    Banner

    This is compilation of research on implementing authentication in applications(Covering authentication using JWT for now, more approaches will follow soon)

    Fundamentals You Must Know

    Cryptography

    About Tokens

    About Frameworks

    Web-Security Recommendations

    Secure Key Exchange In Public

    Maintaining Forward Secrecy

    Invalidating JWT

    • Simply remove the token from the client
    • Create a token blacklist
    • Just keep token expiry times short and rotate them often
    • Contingency Plans : allow the user to change an underlying user lookup ID with their login credentials

    A common approach for invalidating tokens when a user changes their password is to sign the token with a hash of their password. Thus if the password changes, any previous tokens automatically fail to verify. You can extend this to logout by including a last-logout-time in the user’s record and using a combination of the last-logout-time and password hash to sign the token. This requires a DB lookup each time you need to verify the token signature, but presumably you’re looking up the user anyway.

    Securtity Risks and Criticism of JWT

    Implementations(Examples/Demos)

    Useful Tools

    Visit original content creator repository https://github.com/gitcommitshow/awesome-authentication
  • docker-bedrock-base

    docker-bedrock-base

    Dockerised version of the Bedrock WordPress installation with some preselected plugins

    The purpose of this project is to be a base install of WordPress for quick development of small client sites. Common plugins will be pre installed and a component based template will be included as a starting point for template structure and post types.

    This includes a version of bedrock as part of the repo. Go check it out, it’s super cool Bedrock

    Todo

    • work out best way to handle DB migration and backup
    • composer container
      • mount project root
      • for running composer update
      • create commands for update and install etc.

    Requirements

    • docker
    • kitematic (not required but helpful)

    New Install

    • Download the zip of master branch
    • Extract to location of project
    • Copy local .env
    • Copy over ssl certs into config/keys
    • docker-compose build project
    • docker-compose up -d

    Notes

    You’ll need to enable show hidden files on a Mac

    All commands are run from within the root of the project

    Use the following on Mac if you have problems with files not running as sometimes OSX changes the line endings and everything dies
    RUN cat /usr/local/bin/runtime.sh | tr "\r" "\n" > /usr/local/bin/runtime.sh

    Existing project setup

    To include info on migrating db’s etc.

    Useful commands

    delete docker cache (removes all running containers and images)

    docker rm $(docker ps -a -q)
    
    docker rmi $(docker images -q)
    

    Visit original content creator repository
    https://github.com/MobliMic/docker-bedrock-base

  • cli

    npm – a JavaScript package manager

    Requirements

    You should be running a currently supported version of Node.js to run npm. For a list of which versions of Node.js are currently supported, please see the Node.js releases page.

    Installation

    npm comes bundled with node, & most third-party distributions, by default. Officially supported downloads/distributions can be found at: nodejs.org/en/download

    Direct Download

    You can download & install npm directly from npmjs.com using our custom install.sh script:

    curl -qL https://www.npmjs.com/install.sh | sh

    Node Version Managers

    If you’re looking to manage multiple versions of Node.js &/or npm, consider using a node version manager

    Usage

    npm <command>

    Links & Resources

    • Documentation – Official docs & how-tos for all things npm
      • Note: you can also search docs locally with npm help-search <query>
    • Bug Tracker – Search or submit bugs against the CLI
    • Roadmap – Track & follow along with our public roadmap
    • Community Feedback and Discussions – Contribute ideas & discussion around the npm registry, website & CLI
    • RFCs – Contribute ideas & specifications for the API/design of the npm CLI
    • Service Status – Monitor the current status & see incident reports for the website & registry
    • Project Status – See the health of all our maintained OSS projects in one view
    • Events Calendar – Keep track of our Open RFC calls, releases, meetups, conferences & more
    • Support – Experiencing problems with the npm website or registry? File a ticket here

    Acknowledgments

    • npm is configured to use the npm Public Registry at https://registry.npmjs.org by default; Usage of this registry is subject to Terms of Use available at https://npmjs.com/policies/terms
    • You can configure npm to use any other compatible registry you prefer. You can read more about configuring third-party registries here

    FAQ on Branding

    Is it “npm” or “NPM” or “Npm”?

    npm should never be capitalized unless it is being displayed in a location that is customarily all-capitals (ex. titles on man pages).

    Is “npm” an acronym for “Node Package Manager”?

    Contrary to popular belief, npm is not in fact an acronym for “Node Package Manager”; It is a recursive bacronymic abbreviation for “npm is not an acronym” (if the project was named “ninaa”, then it would be an acronym). The precursor to npm was actually a bash utility named “pm”, which was the shortform name of “pkgmakeinst” – a bash function that installed various things on various platforms. If npm were to ever have been considered an acronym, it would be as “node pm” or, potentially “new pm”.

    Visit original content creator repository
    https://github.com/npm/cli

  • xshinnosuke

    XShinnosuke : Deep Learning Framework

    Descriptions

    XShinnosuke(short as XS) is a high-level neural network framework which supports for both Dynamic Graph and Static Graph, and has almost the same API to Keras and Pytorch with slightly differences. It was written by Python only, and dedicated to realize experimentations quickly.

    Here are some features of XS:

    1. Based on Cupy(GPU version)/Numpy and native to Python.
    2. Without any other 3rd-party deep learning library.
    3. Keras and Pytorch style API, easy to start up.
    4. Supports commonly used layers such as: Dense, Conv2D, MaxPooling2D, LSTM, SimpleRNN, etc, and commonly used function: conv2d, max_pool2d, relu, etc.
    5. Sequential in Pytorch and Keras, Model in Keras and Module in Pytorch, all of them are supported by XS.
    6. Training and inference supports for both dynamic graph and static graph.
    7. Autograd is supported .

    XS is compatible with: Python 3.x (3.7 is recommended) ==> C++ version

    1. API docs 2. Notebook

    Getting started

    Compared with Pytorch and Keras

    ResNet18(5 Epochs, 32 Batch_size) XS_static_graph(cpu) XS_dynamic_graph(cpu) Pytorch(cpu) Keras(cpu)
    Speed(Ratio – seconds) 1x65.05 0.98x – 66.33 2.67x – 24.39 1.8x – 35.97
    Memory(Ratio – GB) 1x0.47 0.47x– 0.22 0.55x – 0.26 0.96x – 0.45


    ResNet18(5 Epochs, 32 Batch_size) XS_static_graph(gpu) XS_dynamic_graph(gpu) Pytorch(gpu) Keras(gpu)
    Speed(Ratio – seconds) 1x9.64 1.02x – 9.45 3.47x – 2.78 1.07x – 9.04
    Memory(Ratio – GB) 1x0.48 1.02x – 0.49 4.4x – 2.11 4.21x – 2.02

    XS holds the best memory usage!


    1. Static Graph

    The core networks of XS is a model, which provide a way to combine layers. There are two model types: Sequential (a linear stack of layers) and Functional (build a graph for layers).

    For Sequential model:

    from xs.nn.models import Sequential
    
    model = Sequential()

    Using .add() to connect layers:

    from xs.layers import Dense
    
    model.add(Dense(out_features=500, activation='relu', input_shape=(784, )))  # must be specify input_shape if current layer is the first layer of model
    model.add(Dense(out_features=10))

    Once you have constructed your model, you should configure it with .compile() before training or inference:

    model.compile(loss='cross_entropy', optimizer='sgd')

    If your labels are one-hot encoded vectors/matrix, you shall specify loss as sparse_crossentropy, otherwise use crossentropy instead.

    Use print(model) to see details of model:

    ***************************************************************************
    Layer(type)               Output Shape         Param      Connected to   
    ###########################################################################
    dense0 (Dense)            (None, 500)          392500     
                  
    ---------------------------------------------------------------------------
    dense1 (Dense)            (None, 10)           5010       dense0         
    ---------------------------------------------------------------------------
    ***************************************************************************
    Total params: 397510
    Trainable params: 397510
    Non-trainable params: 0

    Start training your network by fit():

    # trainX and trainy are ndarrays
    history = model.fit(trainX, trainy, batch_size=128, epochs=5)

    Once completing training your model, you can save or load your model by save() / load(), respectively.

    model.save(save_path)
    model.load(model_path)

    Evaluate your model performance by evaluate():

    # testX and testy are Cupy/Numpy ndarray
    accuracy, loss = model.evaluate(testX, testy, batch_size=128)

    Inference through predict():

    predict = model.predict(testX)

    For Functional model:

    from xs.nn.models import Model
    from xs.layers import Input, Conv2D, MaxPooling2D, Flatten, Dense
    
    X_input = Input(input_shape = (1, 28, 28))   # (channels, height, width)
    X = Conv2D(8, (2, 2), activation='relu')(X_input)
    X = MaxPooling2D((2, 2))(X)
    X = Flatten()(X)
    X = Dense(10)(X)
    model = Model(inputs=X_input, outputs=X)  
    model.compile(optimizer='sgd', loss='cross_entropy')
    model.fit(trainX, trainy, batch_size=256, epochs=80)

    Pass inputs and outputs layer to Model(), then compile and fit model as Sequentialmodel.

    2. Dynamic Graph

    First design your own network, make sure your network is inherited from Module and override the __init__() and forward() function:

    from xs.nn.models import Module
    from xs.layers import Conv2D, ReLU, Flatten, Dense
    import xs.nn.functional as F
    
    class MyNet(Module):
        def __init__(self):
            super().__init__()
            self.conv1 = Conv2D(out_channels=8, kernel_size=3)  # don't need to specify in_channels, which is simple than Pytorch
            self.relu = ReLU(inplace=True)
            self.flat = Flatten()
            self.fc = Dense(10)
    
        def forward(self, x, *args):
            x = self.conv1(x)
            x = self.relu(x)
            x = F.max_pool2d(x, kernel_size=2)
            x = self.flat(x)
            x = self.fc(x)
            return x

    Then manually set the training/ testing flow:

    from xs.nn.optimizers import SGD
    from xs.utils.data import DataSet, DataLoader
    import xs.nn as nn
    import numpy as np
    
    # random generate data
    X = np.random.randn(100, 3, 12, 12)
    Y = np.random.randint(0, 10, (100, ))
    # generate training dataloader
    train_dataset = DataSet(X, Y)
    train_loader = DataLoader(dataset=train_dataset, batch_size=10, shuffle=True)
    # initialize net
    net = MyNet()
    # specify optimizer and critetion
    optimizer = SGD(net.parameters(), lr=0.1)
    critetion = nn.CrossEntropyLoss()
    # start training
    EPOCH = 5
    for epoch in range(EPOCH):
        for x, y in train_loader:
            optimizer.zero_grad()
            out = net(x)
            loss = critetion(out, y)
            loss.backward()
            optimizer.step()
            train_acc = critetion.calc_acc(out, y)
            print(f'epoch -> {epoch}, train_acc: {train_acc}, train_loss: {loss.item()}')

    Building an image classification model, a question answering system or any other model is just as convenient and fast~


    Autograd

    XS autograd supports for basic operators such as: +, -, *, \, **, etc and some common functions: matmul(), mean(), sum(), log(), view(), etc .

    from xs.nn import Tensor
    
    a = Tensor(5, requires_grad=True)
    b = Tensor(10, requires_grad=True)
    c = Tensor(3, requires_grad=True)
    x = (a + b) * c
    y = x ** 2
    print('x: ', x)  # x:  Variable(45.0, requires_grad=True, grad_fn=<MultiplyBackward>)
    print('y: ', y)  # y:  Variable(2025.0, requires_grad=True, grad_fn=<PowBackward>)
    x.retain_grad()
    y.backward()
    print('x grad:', x.grad)  # x grad: 90.0
    print('c grad:', c.grad)  # c grad: 1350.0
    print('b grad:', b.grad)  # b grad: 270.0
    print('a grad:', a.grad)  # a grad: 270.0

    Here are examples of autograd.

    Installation

    Before installing XS, please install the following dependencies:

    • Numpy
    • Cupy (Optional)

    Then you can install XS by using pip:

    $ pip install xshinnosuke


    Supports

    functional

    • admm
    • mm
    • relu
    • flatten
    • conv2d
    • max_pool2d
    • avg_pool2d
    • reshape
    • sigmoid
    • tanh
    • softmax
    • dropout2d
    • batch_norm
    • groupnorm2d
    • layernorm
    • pad_2d
    • embedding

    Two basic class:

    – Layer:

    • Dense
    • Flatten
    • Conv2D
    • MaxPooling2D
    • AvgPooling2D
    • ChannelMaxPooling
    • ChannelAvgPooling
    • Activation
    • Input
    • Dropout
    • BatchNormalization
    • LayerNormalization
    • GroupNormalization
    • TimeDistributed
    • SimpleRNN
    • LSTM
    • Embedding
    • ZeroPadding2D
    • Add
    • Multiply
    • Matmul
    • Log
    • Negative
    • Exp
    • Sum
    • Abs
    • Mean
    • Pow

    – Tenosr:

    • Parameter

    Optimizers

    • SGD
    • Momentum
    • RMSprop
    • AdaGrad
    • AdaDelta
    • Adam

    Waiting for implemented more

    Objectives

    • MSELoss
    • MAELoss
    • BCELoss
    • SparseCrossEntropy
    • CrossEntropyLoss

    Activations

    • ReLU
    • Sigmoid
    • Tanh
    • Softmax

    Initializations

    • Zeros
    • Ones
    • Uniform
    • LecunUniform
    • GlorotUniform
    • HeUniform
    • Normal
    • LecunNormal
    • GlorotNormal
    • HeNormal
    • Orthogonal

    Regularizes

    waiting for implement.

    Preprocess

    • to_categorical (convert inputs to one-hot vector/matrix)
    • pad_sequences (pad sequences to the same length)

    Contact

    Visit original content creator repository
    https://github.com/E1eveNn/xshinnosuke